Saturday, December 3, 2011

I Scream You Scream We All Scream for Rustic! Pumpkin White Chocolate Biscotti. Whole wheat style.

When my mom was visiting in November she made pumpkin white chocolate biscotti. They were obviously delicious (everything she makes is delicious) and strikingly beautiful (everything she makes is beautiful). My mom's a much more precise cook and baker than I am. She puts the time into making things as aesthetically appealing as they are tasty, she enjoys that aspect of her kitchen exploits, and she's v. skilled at the task. I never realized how skilled until I tried to do the same thing and ... um ... in making my own pumpkin white chocolate biscotti after she left (I was craving more after we devoured her batch), ended up with biscotti that were obviously delicious and strikingly rustic.

Mom's version:

mom's

My version:

sliced and baked

You see what I'm getting at. The good news is this: rustic is still totally in, right? And so my blog continues!

biscotti blockbiscotti close up

We used different recipes. Hers had butter. Mine didn't. I liked the taste of mine better but that's likely because I've developed a palate that favors baked goods with whole grains and heavy doses of spice over the years. So here we are, I'm sharing my version with you in all its rustic, whole wheaty glory.

Maybe the butter in my mom's recipe made the dough more malleable and thus beautiful? Or maybe it's because she is way better at flouring her hands than I am. Regardless, she's my hero.

sliced and plated

Whole Wheat Pumpkin White Chocolate Biscotti
Adapted from Simply Recipes
Yield: ~ 20 biscotti

2 1/2 cups whole wheat pastry flour (or spelt flour)
3/4 cup turbinado or demerara sugar (plus more for sprinkling)
1 teaspoon baking powder
1 teaspoon cinnamon*
1/2 teaspoon ground galangal or ginger*
1/4 teaspoon salt (plus more for sprinkling)
2 eggs
1/2 cup pumpkin purée
1 teaspoon vanilla extract
1 cup white chocolate chips or chunks (the bigger the better - seriously)

Preheat oven to 350°F. Whisk together whole wheat pastry flour, salt, sugar, baking powder, and spices into a large bowl. Using a wooden spoon, stir in the eggs one at a time, then the pumpkin pumpkin purée, and vanilla extract. Stir in the white chocolate until incorporated (I used my hands for this because the dough is quite thick and crumbly).

Using flour hands, form the mixture into two logs, about 10" X 7", one to one-and-a-half inches tall. Place the logs on a parchment or Silpat-lined or lightly greased baking sheet, sprinkle with about a tablespoon of extra sugar and 1/4 teaspoon salt, if desired, and place on upper and lower oven racks. Bake for about 20 minutes, rotating pan after 15 minutes, until the logs are dry and their centers are firm to the touch.

Let biscotti cool for 15 minutes and then use a serrated knife to cut each log into about 10 1-inch wide slices. Lower the oven heat to to 275°F and bake the slices for an additional 20 minutes, until slices are golden brown and no longer doughy in the middle. Cool completely. They will continue to crisp up as they sit out. Store on a plate, uncovered, for at least 3 days. (Once they are crisp enough to your liking, you could store them in an airtight container or ziploc bag if you have issues with your food just hanging out in the open. I evidently don't.)

*Galangal is wonderful. Buy some. Seriously. It's like ginger only fascinating. And fruity. You could use pumpkin pie spice or apple pie spice or Penzey's cake spice instead to make them even spicier.

Tuesday, November 29, 2011

In Praise of Libraries, Part 2: Pomegranate-Eggplant Spread and Red Lentil-Bulgur Salad

Because I feel that yesterday's post adequately conveyed my love for Purple Citrus and Sweet Perfume: Cuisine of the Eastern Mediterranean and my satisfaction with all four things I've made from the book during its temporary stay in my home (it's due back at the library on Thursday), today I'm just going to give you the recipes.

The pomegranate-eggplant spread is just plain lovely. Best at room temp, it was excellent both slathered on some homemade bread and dolloped on top of the lentil-bulgur salad. I did not have aleppo pepper, called for in the recipe, but I substituted a mixture of cayenne and smoked paprika and it was great. I'd like to get my hands on aleppo pepper - they have it at Penzey's - because it's featured in quite a lot of the book's recipes. For whatever it's worth, my husband hates eggplant but went back for more of this. The flavor combination is truly something special.

Eggplant-pomegranate spread

The lentil-bulgur salad is actually not something you'd be able to track down in the actual cookbook. It's the (delicious) result of some koftes (fortunately) gone wrong. I just couldn't get the lentil-bulgur mixture to hold together. I suspect reader error rather than cookbook flaw. Regardless, the salad version - which we served room temp on a bed of fresh spinach - was delightful.

Red Lentil-Bulgur Salad

I'm sorry my pictures aren't especially appetizing. It was attractive in person; my photography skills just fail me sometimes.

Oh and a quick ingredient note: pomegranate molasses, used in both recipes, can be found at Mediterranean or Middle Eastern grocery stores, specialty grocery stores, and at least some co-ops (the Wedge, for one). There are also recipes for it online and in the cookbook raved about herein. (I used store-bought.) If you buy it and don't know what to do with the leftovers, mix it with equal parts lemon juice and olive oil, add a little salt and pepper, and you've got a lovely salad dressing. Za'atar is also available at certain ethnic and specialty grocery stores, but I made my own, based on a recipe from Purple Citrus (so I guess I've made FIVE recipes from this cookbook!), which is similar to the recipe found on Epicurious. It's nice on scrambled eggs.

Pomegranate-Eggplant Spread
Adapted from Eggplant, Aleppo Pepper and Pomegranate Spread recipe, p. 28
Yield: About 3 cups (I actually halved the recipe and got about 1.5 cups)

1 large eggplant (or 2 small)
3 tablespoons olive oil or sesame oil
1/2 teaspoon ground coriander
1/2 teaspoon ground allspice
1/2 teaspoon smoked paprika
1/8 teaspoon cayenne pepper
1 garlic clove, minced
1 large tomato (or 2 small), finely chopped
2 teaspoons pomegranate molasses
seeds from 1 small pomegranate
3 tablespoons finely chopped cilantro
salt and pepper to taste
zest of 1/2 a lemon

Wash and trim the eggplant; halve the eggplant lengthwise and then slice thinly.

Heat oil in a saucepan (I used a 2 quart - worked well) and add the eggplant slices a few at a time, cooking them until golden brown (about 8 minutes). Stir in the spices and garlic. Add the chopped tomatoes and pomegranate molasses and simmer on low heat until the liquid is almost gone and the eggplant has broken up and become soft and spreadable (about 15-20 minutes). Transfer to a bowl and allow to cool. Add the pomegranate seeds and cilantro to the cooled eggplant mixture, taste and add salt and pepper appropriately. Sprinkle with the lemon zest before serving. Serve at room temp or cold; it stays well in refrigerator for at least two days.

Red Lentil-Bulgur Salad
Adapted liberally/accidentally from the Red Lentil Kofte with Pomegranate and Cilantro Salad recipe, p. 30
Yield: 4 servings

1 tablespoon olive oil or sesame oil
1 onion, minced
1 tablespoon ground cumin
1 tablespoon Za'atar
1 teaspoon ground coriander (optional)
1 teaspoon sweet paprika
1/2 cup red lentils
1 tablespoon pomegranate molasses
1/2 cup dry bulgur
1/4 cup finely chopped fresh cilantro
1 tablespoon tomato paste

Heat the oil in a saucepan and heat the onion for 2-3 minutes, until just softened. Add the cumin, za'atar, paprika, and coriander, and cook for 2 minutes more. Stir in the lengtils and then pour in the pomegranate molasses and 1 1/4 cups water. Cover and simmer for 8-10 minutes. Add the bulgur, combine well, and season with salt and pepper. Remove from heat and allow bulgur to absorb any remaining moisture. Place mixture in a bowl to cool. Once cool, stir in the cilantro and tomato paste. Serve room temp, slightly warm, or cold, as is or on a bed of salad greens of choice. (I liked it best a little warm. It was extra special with a little of the eggplant dip dolloped on top.)

Monday, November 28, 2011

In Praise of Libraries, Part 1: Mediterranean Meatballs

One of my favorite food bloggers is Dana from Dana Treat. I like her not only because I have a special fondness for most Danas but also because her recipes are all manageable and delicious, she is prolific - seriously, when nobody else is blogging with appropriate frequency, Dana is - and, while I haven't yet had the nerve to tell her this myself, I totally think we are kindred spirits. We are both West Coasters. We were both drama majors in college. We both lived in London. We both have two children. We both are passionate about food and yoga and writing and we both are addicted to cookbooks. As of last month, we both teach cooking classes (woo-hoo!). Incidentally, and significantly in the food blogosphere, we differ in that she became a vegetarian while traveling in Europe in her early twenties, while I started eating meat while traveling in Europe in my early twenties. Nonetheless, I've been meaning to send her an email to tell her all the things we have in common, ask her for some guidance in a few areas (she's ahead of me in figuring stuff out and accomplishments and life generally), and invite her over for dinner next time she happens to be in the Twin Cities. But I don't do even a fraction of the things I mean to do most days, so that email is as of yet unwritten. If and when I do end up writing that email, I will have to specifically thank her for featuring on more than one recent occasion recipes from Purple Citrus and Sweet Perfume, a beautiful, unique, and super inspiring cookbook by Bulgarian-born London chef Silvena Rowe. The recipes are Eastern Mediterranean (wow, I spelled that word wrong three times before getting it right) and they are both (a) absolutely delectable (despite the fact that they use several ingredients to which I am averse (lamb) or allergic (pistachios, cashews, walnuts)), and (b) vastly adaptable (important considering (a)).

Speaking of beautiful, unique, and inspiring: Diana Gabaldon's Outlander, Iris Murdoch's The Sea, The Sea and Lee Smith's Fair and Tender Ladies. These are not new books. These are books that remind me why we should read old books. These are books that humble me deeply but also make me laugh. I digress.

Because of Dana's unwitting influence and a family compromise that involves no more cookbook purchases, I checked out Purple Citrus and Sweet Perfume from the library a few weeks ago. It was doubly revelatory: (1) the book is, as mentioned above, fantastic, one I definitely want in my cookbook library at some point; (2) I am going to always check out cookbooks from the library now because it's a wonderful filtration device! I've since checked out three other cookbooks that would have been on my Amazon wishlist had I not skimmed them and learnt they are not worthy of my shelves. This is a wonderful way to dabble. And I'm kind of embarrassed about all that I'm writing right now because it's such a freaking given. You are all probably like, "yeah, I check out cookbooks from the library all the time." Well, I didn't until late October. Don't judge me. I've always been a slow developer.

When my mom visited recently, we put together a Mediterranean feast one Friday night. It was so so so so good. And so different, which was extra cool. I'm posting the "entree" recipe today, then two more recipes we made tomorrow, and the fourth one - which my mom made with no help from yours truly - deserves a post of its own, in which I will include some commentary on my mom's way of cooking versus my own and how the former really wins where aesthetics are concerned. Sometimes aesthetics are really important.

Anyway - recipe number one is below. My adaptations were of the sort I discuss in my Cooking Local Through Winter class: using preserved vegetables (the tomatoes) and herbs (the oregano) in place of fresh ones when they are not in season. (I also omitted olive oil from the sauce and used more meat than Ms. Rowe calls for.) These are so heavenly that I made them two nights in a row and ate the leftovers for lunch two days in a row. Enjoy!

And I don't care what Parks & Recreation says, libraries are the best!

Mediterranean Meatballs

Mediterranean Meatballs
Yield: 4 good-sized servings

For meatballs
1.5 oz bread (one slice)
1/3 cup milk
1/2 lb ground beef
1/2 lb ground pork
1 onion, finely chopped
1/4 cup finely chopped parsley (I used curly)
1 egg
1/2 teaspoon ground cumin
1/2 teaspoon red chili flakes
1/4 teaspoon dried oregano
1/4 teaspoon sweet paprika
Salt and pepper
Flour, for dusting meatballs
Olive oil, for browning meatballs

For tomato sauce
1 15-oz can whole tomatoes, with juice (or about 1.5-2 cups of tomatoes and juice from a larger can or jar)
1 tablespoon tomato paste*
1 teaspoon sweet paprika
1 teaspoon dried oregano

Preheat oven to 400 degrees F.

Soak the bread in the milk for a few minutes. Squeeze the excess milk from the bread and crumble it into a large bowl. Add the ground beef, ground pork, onion, garlic, parsley, egg, cumin, chili flakes, paprika, and oregano. Combine well (I just used my hands) and season with salt and pepper. Split the mixture into 12 equal amounts and form into balls. Dust each ball with a bit of flour.

Heat 1-2 tablespoons olive oil in a nonstick pan or cast iron skillet over medium high heat. Cook the meatballs for about 5 minutes, rotating them periodically so that all sides brown. Transfer them into a small baking dish.

To make the sauce, mix together tomatoes with juice, tomato paste, paprika, and oregano. Season and cook over low heat, breaking up the tomatoes with a wooden spoon, stirring constantly. Once the juice has reduced a bit (about 5-7 minutes), pour the sauce over the meatballs.

Bake for 20 minutes, until the sauce is bubbling. Serve hot.
-------
* Not critical. I ran out on day 2 and didn't notice a difference in the finished product.

Sunday, November 20, 2011

Overcoming internal conflict: Cranberry-Biscoff Upside Down Cake

Guess what I've got for you today, friends? I'll give you a hint: it's tart, speculoosy, and uber-festive. If you guessed Cranberry-Biscoff Upside Down Cake, you are right. You also have some amazing supernatural guessing powers.

Berry festive

I made Cranberry-Biscoff Upside Down Cake because maybe you bought that Biscoff spread to make granola... and maybe you need something to save you from yourself... a recipe with which to use the Biscoff spread so that it doesn't all end up in your mouth via spoon. I care about you. I'm here to help.

I was initially unsure about whether I should post this recipe for you because, as beautiful and festive as it turned out (see photo above), the first slice of it that I ate (the same day it was baked) was overwhelmingly tart. I think I'd forgotten what cranberries tasted like over the last year. Furthermore, I nibbled on a few crumbs of the cake before actually tasting the upside-down-cranberry part, and I was IN LOVE with its subtle spice and perfect texture. When I subsequently felt that the cranberries overpowered the lovely, delicate flavor of the cake, I thought I'd try making the cake without the cranberries, perhaps with a maple glaze or something to really showcase the Biscoff flavor. But then two things happened that, combined, motivated me to post about this cake:

1. I had another slice the next day. The cranberry topping had mellowed a bit and the cake flavor was holding its own better than it had on day 1.

2. I stumbled on a Smitten Kitchen post from about a year ago with (a) an upside-down cranberry cake recipe, and (b) reservations. S.K. Deb felt her cake lacked sufficient flavor to contrast the cranberriness of her cake. (I felt that no cake flavor could effectively contrast the flavor of cranberry.) She also was disappointed in her cake's appearance, and then searched the internet to find other cranberry upside-down cake photos to make sure hers wasn't subpar. (I thought my cake was stunning. And I searched the internet for comps as well.) If Deb can recommend an upside down cranberry cake recipe with two reservations, then I can recommend an upside down cranberry cake recipe with only one reservation - a reservation that was mostly moot after a day of mellowing out on the cake stand. The word "cake" is in the title of my website, after all. I have to deliver sometimes, don't I?

So here we are.

cranberry cake collage

Oh wait, three things happened:

3. We ate the whole cake in two days.

If you have any concerns about the cranberry domination that occurs when the following recipe is made - like, say, because you hate cranberries - just skip the cranberry part. The cake itself is unequivocally delicious. With a simple powdered sugar glaze with a little cinnamon and orange juice... dang. Next time! (And I'm not kidding. I totally have another jar of Biscoff in my pantry.)

finished. sliced. yum.

Here's the recipe.

Cranberry-Biscoff Upside Down Cake
Adapted (significantly) from Martha Stewart
Yield: 10 servings

12 tablespoons unsalted butter, room temperature, plus more for pan
3/4 cup all-purpose flour, plus more for pan
16 ounces fresh or defrosted frozen cranberries
1/3 cup pure maple syrup
1 teaspoon ground cinnamon
1 teaspoon baking powder
1/4 teaspoon salt
6 tablespoons yellow cornmeal, preferably coarse
1/4 cup Biscoff spread
1/2 cup plus 2 tablespoons sugar, divided
3 large eggs, separated
1 teaspoon pure vanilla extract
1/2 cup milk

Generously butter and flour a 10-inch round springform pan; set aside. In a large skillet, heat 6 tablespoons butter over medium heat until it sizzles. Add cranberries, and cook until shiny, 2 to 3 minutes. Add maple syrup and cinnamon. Cook, stirring frequently, until cranberries soften, about 3 more minutes.

Remove cranberries from skillet with a slotted spoon, and transfer to a large plate to cool slightly. Set skillet with syrup aside. Once cooled, distribute the cranberries evenly in the prepared springform pan. Return skillet with syrup to medium heat, and cook until syrup boils, 3 to 4 minutes. Pour hot syrup over cranberries, and let cool while you prepare the cake batter.

Preheat oven to 350 degrees.

In a bowl or large measuring cup, whisk together flour, baking powder, salt, and cornmeal. in cornmeal with a fork.

In the bowl of an electric mixer, combine the remaining 6 tablespoons butter and the Biscoff spread. Using the paddle attachment, beat on medium speed until well combined, about 30 seconds. Gradually add 1/2 cup sugar and beat until creamy. Add egg yolks and then vanilla extract, beat until well combined. Add flour-cornmeal mixture in two batches, alternating with milk. Set aside.

Using a whisk attachment or a handheld beater, beat the egg whites in a clean bowl until foamy. Slowly add 2 tablespoons sugar; beat until soft peaks form. Whisk a third of the white into the batter, then fold the remaining whites in with a rubber spatula.

Spread batter over cranberries and bake for 45 minutes, or until a toothpick inserted in center comes out clean. Place a baking sheet beneath the pan in case the cake overflows (mine didn't). Let cool in pan 2 hours before inverting cake onto a plate and carefully releasing spring. I found that running the flat side of a large sharp knife along the top of the cake to release the pan bottom worked well. It all stayed intact and, well, in my humble opinion was quite pretty.

Friday, November 18, 2011

Bad Highlights, Good Cooking Classes (with a note at the end for my 11/18 class participants)

First things first: I am teaching my second cooking class tonight. Yay! I'm v. excited, nearly as nervous as last time, and sad that I have terrible accidental frosty highlights and less-than-best skin right now. Living in my little hole (condo) with little ones and little interaction with adults, I have little reason to worry about my appearance most of the time. In fact, I'm lucky to shower every third day. But this opportunity has challenged me. Standing in front of 21 super attentive, semi-hungry, eager-to-be-engaged-and-educated adults is different and nerve-wracking. Hair color is a statement. Shoes are a statement. Glasses are a statement. Blemishes are awkward. Everything matters when people are looking at you for three hours - and believe me, they are too polite not to look, we are Minnesotans after all! It's super flattering and super disconcerting all at once. I've been thinking about this a lot lately and have come to realize that if I intend to engage, entertain, educate, and - hope of all hopes - inspire people (over the age of two), which of course I do, I need to be precise about what my goals are and calculated in how I accomplish them. My anything-goes, super casual, somewhat chaotic approach to daily life is not going to cut it if I want to change the way people think about food and share my knowledge credibly. I want to be taken seriously; I believe my expertise is worth the cost of registration. I don't want bad highlights to be part of the equation. I don't want anything about my appearance to be a distraction. (Except maybe shoes. I would love to wear some rockin' shoes.) Tonight I'll put my hair back and hide the frost as best as I can, but before I teach my next class (and before I go to my husband's holiday work party, for that matter), I need to fix this. First impressions matter. Especially when you need respect and trust in order for you to (calculatedly) accomplish your (precise) goals. I imagine that each time I teach a class I will realize another thing about my manner or appearance or curriculum that will need to be adjusted. It's oddly invigorating. (Also odd is the fact that I'm way more preoccupied about this as a cooking instructor than I was sitting in a courtroom all day supporting a judge - perhaps because being presentable was a given then, plus I was never a focal point in the courtroom, except for maybe when I was nine months pregnant.)

Below is a list of classes I'll be teaching through February, in case you are either interested in learning how to cook and eat local food when it's at its best, or simply curious about my frosty highlights. All classes are at Local D'Lish, in the Warehouse District/North Loop Neighborhood just outside of downtown Minneapolis. Wednesday and Friday classes are in the evening; Sunday classes are in the afternoon. Call superstars Ann, Kate, or Erika at Local D'Lish for more info!

Nov. 18 (tonight!) and Nov. 27: Eating local through winter
Dec. 7: Root vegetables
Dec. 16: Vegetarian cooking through winter
Jan. 18: Cooking for the week
Jan. 25: Heartland hot dishes
Jan. 29: Healthy meals for kids
Feb. 22: Three great winter soups

I'll be teaching 4 classes per month starting in March 2012.

Here is what I looked like on my way to teach my first class, over a month ago. There's a gynormous food processor in my bag. (And yes I digitally whitened my teeth in this picture.)

Edith's First Day of Work

Here is what I've been making a lot lately in my own kitchen, incidentally the first thing I ever blogged about at Cake and Edith. This version included edamame and sprouted chickpeas. Delicious topped with some plain yogurt and a heavy douse of (decidedly nonlocal) Cholula. Yesterday I ate four of them. I eat a lot.

mom's visit 059

For those of you who attend(ed) my class: thanks so much for your participation! I hope you enjoyed yourselves and I'd love to hear about how your locavore aspirations go this winter! Thank you so much for waiting for that final quiche to cook up. Sorry about the bad highlights.

UPDATE 11/20/11: Also, following up on the after-class discussion about Minnesota's growing season (hi, hip silver-name-tagged mamas!), the document I referred to can be found HERE, on the St. Paul Farmer's Market website. It's a great visual aid, but note how our wacky weather can really change things however. Broccoli was still being harvested last week, in mid-November, for instance, and our roots and winter squash similarly had a later season due to our extended, warm fall.

Sunday, October 30, 2011

Heaven in my cereal bowl: Speculoos Granola

Do you ever fly Delta? When they offer you peanuts, pretzels, or cookies, do you choose the cookies? If you choose peanuts and pretzels, is it because you haven't ever had the Delta cookies and thus don't appreciate the transportive culinary experience you are missing when you let that ship sail? Because really. The Biscoff cookies that Delta serves you in-flight are some of the best cookies ever. They are v. European-tasting, and that is because they are indeed European. They're crisp spiced cookies made by the Belgian bakery called Lotus. They are the only thing I like about flying (unless you count eating at the MSP airport's mini-French Meadow Bakery across from Gate F4, which might not count because that isn't really "flying" so much as hanging out at the airport - oh and I know there is also a larger, table-service French Meadow Bakery at the opposite side of the Lindbergh Terminal near the entrance to Gates E, D, and C, but I don't like that one as much).

I'm really lucky that Northwest and Delta merged because before they did I didn't like anything about flying.

So in the foodblogosphere, there's been talk here and there about this European spread called "Speculoos spread". It's sometimes compared to peanut butter. Or, probably more aptly, on account of its decadence, and European-ness, Nutella. Speculoos spread is notably different from peanut butter and even Nutella, however, in that it is entirely lacking in nutritional value. No peanuts. No hazelnuts. Not a lick of protein or fiber in this stuff. That's because it is made of COOKIES. It's cookie spread. Or, as David Lebovitz called it, awkwardly, "gingersnap paste". It's Biscoff cookies, mixed with more oil and more sugar than are already in the cookies to begin with, which you use to spread on your toast or apples. Or cookies. Naturally, I've been wanting to get my hands on this for years. I was waiting for the right time, and that time arrived when my husband and I, during our daily research on how to earn Delta miles (we're going to Italy next year and would like to get a flight or four for free if possible, and I assure you our dedication to the cause is making it seem more and more possible every day), discovered that you can buy Biscoff cookies as well as Biscoff (Speculoos) spread through the Delta Skymiles Shopping website, for several miles per dollar.

It arrived last week. I don't really have to tell you that it's WON-DER-FUL, do I? It's cookie spread, for heaven's sake. Of course it's wonderful.

That said, it's an odd pantry item to incorporate into one's meals, at least if such meals exclude my new favorite bedtime snack: a heaping spoonful of Speculoos spread. I've wanted to bake with it but feel kind of weird making cookies out of something that used to be cookies... so I opted for granola.

jarred granola

Um. DANG. So good. And, you know, kind if redeeming, since the way I combined it with grains and seeds and plan to serve it with plain yogurt and some sliced bananas or roasted apples allows the flavor of Speculoos spread to work its magic while being more than just cookies.

granola collage

Oh and you don't have to order it online. They had it at the Lunds across the river last week. On sale, no less!

Biscoff at Lunds!

I basically used Mark Bittman's formula/ratio for granola. I think even more Biscoff spread and oil would have been even more delicious, but I was committed to making this as breakfast-worthy as possible. If you are one of those people who can eat anything and remain healthy and thin always, go to town and double both.

Here's what I did.

1. Preheated oven to 300 degrees.

2. Placed following ingredients in a bowl:

3 cups oats
3 cups puffed millet
1 cup King Arthur Flour harvest grains blend
1 cup King Arthur Flour malted wheat flakes
1/2 cup sunflower seeds
1/3 cup wheat germ
1/3 cup oat bran
1/3 cup blackstrap molasses
1/3 cup rice bran oil (any oven-proof oil would be fine here)
1 heaping cup Biscoff spread
1 teaspoon coarse salt + cinnamon or other spices (I had Cinnamon Salt. It was perfect.)

3. Mixed it all with my hands. A spoon would work but hands are fun and then you can form big clumps, which I quite like in my granola.

4. Spread mixture on two baking sheets.

5. Placed on racks in oven, put oven on convection bake setting at 300 degrees, tossed granola carefully every ten minutes and rotated pans (both shelves and direction), baked for 30 minutes total, allowed to cool.

6. Put some in a jar for a friend (Hi, Friend!) and the rest in a big IKEA cereal container for my family.

I can't stop eating it. It's salty-sweet addictive breakfast heaven.
--------------------------------------------------------------------
P.S.!!!! Speaking of salty-sweet addictiveness! Christina Toki's Momofuku Milk Bar cookbook is finally out. I am not allowed to buy any more cookbooks this year. But my birthday is in about 60 days.

P.P.S. Biscoff (American) = Speculoos (European). Just to clear up any confusion.

Tuesday, October 25, 2011

A Seasonal Soup for Wellness: Lemon-Rice Soup with Winter Squash and [You Fill in the Blank]

This weekend my husband took care of me and our under-the-weather family. I was sick and exhausted and needed it so, so much. He did a good job. He's a good carer. He beat himself up on Sunday, however, because he took our toddler with him to the grocery store with a mind to return with chicken noodle soup. He wanted to ease me back into food consumption slowly, healthily. He rightly anticipated that I'd probably overdose on animal crackers once I got my appetite back if there weren't chicken noodle soup available to me as an alternative. He knows me well. (But he forgot to actually buy the chicken noodle soup.)

I'm feeling much better now, despite the absence of chicken noodle soup from our home. But ever since he mentioned it, repeatedly, because he really felt way more terrible about it than he ought to have, I've been thinking about chicken noodle soup. I've heard and read that there is truly something healing about chicken noodle soup. And, you know, whatever, I believe it enough. But as my body was striving to recoup, it wasn't really craving chicken and noodles. It craved broth, for sure. But it wanted ginger and lemon and herbs and rice. It wanted heaps of vegetables, specifically mild, seasonal ones that would be easy on our still-sensitive bellies.

prep

Randomly, annoyingly, I ended up making a huge amount of steak in the midst of our stomach flu, not because we had any desire to eat red meat at the time but because I'd thawed it a few days before and felt it should not stay thawed and uncooked in the refrigerator for too much longer.

So the combination of my body's cravings and the necessity to use up cooked steak resulted in a pot of soup this afternoon. Sadie and I enjoyed it v. much. It was brothy and lemony and it smelled and tasted and felt so nourishing. I'm glad we were out of animal crackers at lunch time because I might not have thrown this delight together otherwise. It's so much better for us than animal crackers. And so much better than chicken noodle soup.

P.S. You'll super like this even if you're not sick.

toddler servingmama serving take 2

Lemon-Rice Soup with Winter Squash and [You Fill in the Blank]
From me
Yield: 4-6 servings

2 tablespoons sesame oil or olive oil
1 cup chopped winter squash (I used peeled butternut; a single, unpeeled delicata squash would be great here)
1/2 to 1 cup chopped carrots (about 2 small carrots)
Zest and juice of 1 lemon
2 teaspoons fresh grated ginger
1 teaspoon minced garlic (2 cloves)
2 teaspoons ground cumin (or more)
1 teaspoon dried oregano (or more)
5 cups water or broth or combination (I used 1 cup chicken broth + 4 cups water)
1/2 cup dry white or brown or wild or whatever rice (I used red rice - it's v. pretty)
1 cup chopped, ground, or shredded cooked meat* or beans**
Dashes of the following: Persian limes, sumac, coriander, red pepper flakes (optional)
1/3 cup chopped cilantro
Salt and pepper

Optional: Top with avocado slices and hard-boiled eggs

Heat the oil over low-medium heat in a soup pot. Add the winter squash and carrots, 1/4 teaspoon salt, and saute until softened a bit, about 4 minutes. Add the lemon zest, ginger, garlic, cumin, and oregano and stir for one minute. Add the broth and bring to a boil over medium heat. Add the rice and meat or beans, simmer until rice is cooked through (time will depend on what kind of rice you use - follow package instructions or check after 20 minutes and then again every 5-10 minutes). Remove from heat and stir in lemon juice, cilantro, any other spices you'd like, 1 teaspoon salt, and a lot of freshly ground pepper. Ladle into bowls and eat with a lot of crusty bread to soak up all that fantastic broth.

* Lamb, beef, chicken, turkey, whatever
** Cooked chickpeas or white beans would be good, or uncooked lentils or split peas

Monday, October 24, 2011

Elsewhere (when creativity eludes me)

I swear. We've been cooking and baking (even canning) up a storm here in the Cameron household. The decidedly autumnal turn the weather's taken in the Twin Cities has facilitated a domestic streak.

Wait. Maybe by "domestic streak" I mean homeboundedness (a word, do you think?) and by "decidedly autumnal turn in the weather" I mean stomach flu. Ugh. The least sexy food blog intro ever.

We still get food on the table during these periods of malaise, but that food is at best inspired by someone else's creativity rather than my own, and at worst delivered to our condo in a large cardboard box.

Here are some of the successes we've had relying on the brilliance of others in the foodblogosphere (oh and Ms. Garten, of course). Notwithstanding the commentary below, (you'll see), I believe I'd recommend them all.

white chocolate baguettes

White Chocolate Baguette - Maybe if you've vacationed at Club Med you're familiar with this? At any rate, it's even better than it sounds, and I assure you it sounded REALLY good to me. My breadmaker husband adapted the recipe so that it was a 2-day process, there was a soaker/biga/whatever, and the bread ended up much airier than the one in the Love & Olive Oil pictures.

purple potato chips

Rori's Potato Chips made with some cute little purple potatoes. I basically used the recipe on p. 77 of Barefoot Contessa Parties, only with half the oil and a lot more spice. They were good.

kale chips

Not as good but nearly: Kale Chips. I used Joy the Baker's recipe, though there are a million out there. It worked. As evidenced by toddler consumption. I seasoned with cinnamon-salt and a cayenne-tellicherry pepper blend.

Butternut squash crusted quiche

Butternut Squash-crusted Quiche - Inspired by my friend Nicole (hey, maybe if I link to her blog she'll blog again?), I made this when we went gluten free for five minutes. I butchered the recipe in a valiant yet misguided effort to be resourceful. I also was trying to be considerate of my husband's preferences, which exclude mushrooms. The recipe is excellent. I am sure it is excellent. What is not excellent is cabbage in a quiche. This is probably why you don't often find cabbage in quiche. I wasn't expecting to create the next big culinary thing here. But still, I was thrown by how strong the cabbage flavor was after such a long time in the oven. Despite its cabbaginess, I (mostly singlemouthedly) ate the whole thing and (mostly) enjoyed it.

cabbage pizza with magic sauce

Japanese Pizza - This is what I should have done with ALL the cabbage, since Heidi never lets me down. This is delicious. My 2-year-old liked it. I liked it. I want it again. It's like a giant cabbage fritter. But surprisingly delicious, and then even more delicious with 101 Cookbook's Magic Sauce.

Quark cookies

Quark Cookies - compromised Cream Cheese Cookies, because I can't leave well enough alone. These were tasty, with quite a tang to them - but then quark is tangier than cream cheese. I feel they got better on days 2 and 3 of their short lives. They ended up quite flat, so not as pretty as in the Food 52 picture, but still lovely.

Godspeed.

Until I get my act together, hopefully soon,

Edith xoxo

Wednesday, September 28, 2011

Labour of Love. Fit for a Queen. (Begging for Short Cuts.) Coronation Chicken Salad.

When I studied in England, coronation chicken salad was introduced to me as one of the tastiest (albeit occasionally forbidden) sandwich fillings I'd ever tasted. Prior to making its acquaintance, I never really liked chicken salads. Most of them have a mayonnaise base, I dislike mayonnaise intensely, and I don't find chicken a flavorful enough ingredient to mask the mayoness of the mayonnaise saladifying it. (Sometimes I make up words. I'm like Shakespeare that way.) The unequivocal Englishness of something called "coronation chicken", however, was irresistible to me. So I tried it. And I loved it. And thereafter, whenever I happened upon coronation chicken on a menu or in a sandwich case, I would ask if it had nuts (it occasionally did, hence its status as occasionally forbidden) and then promptly devour a hearty portion of it as soon as I was given the go-ahead.

What the heck is coronation chicken salad? Only the best chicken salad ever, invented to be served at Queen Elizabeth's coronation lunch in 1953. According to the Guardian, coronation chicken was first "created by the founder of Le Cordon Bleu cookery school, Rosemary Hume. ... Poulet reine Elizabeth, as it was originally known, was a deliberate and tactful compromise between the luxurious and the thrifty for a country still under the dreary yoke of postwar rationing." It's sort of retro now and a lot of recipes for it floated around the internet around the time of the recent royal wedding.

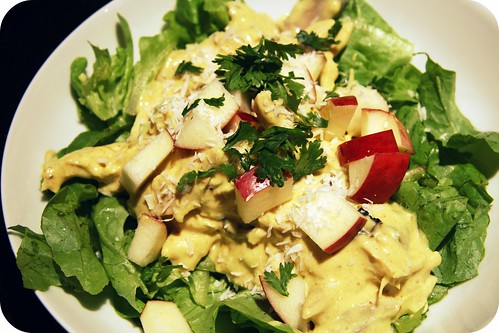
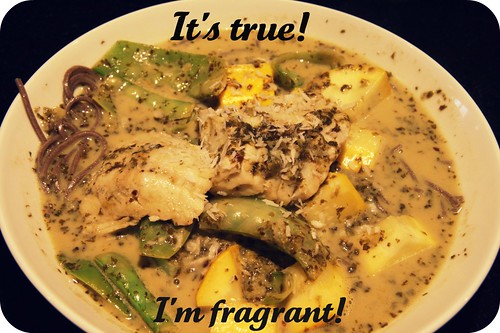
It's basically like curried chicken salad. Only better, because it is unabashedly, royally sweet, incorporating one or several of the following: apricot preserves, mango chutney, raisins or other dried fruit, and sweet curry powder. And it's bright yellow. Like a mango. Quite pretty really.

I've casually looked for a good coronation chicken salad recipe for the last decade. Some looked like they weren't sweet enough. Others had dauntingly long lists of ingredients (like this one).

citrusy chicken broth

Most called for an amount of mayonnaise I just couldn't stomach.

sauce meets chicken

Then I turned 32. And I got a whole bunch of cookbooks for my birthday. Including one of the kitschiest, funkiest cookbooks I've ever seen - Great British Food, an ode to - you'll never guess - Great British Food, written by the owners of London's Canteen restaurants, devoted to bringing great, accessible, affordable (and localsustainableetcetera) British food to the masses. (I'm not going to waste time here countering the passe notion that British food is awful. It's not awful. It's wonderful. But it was misunderstood for a while. Books like Great British Food and restaurants like Canteen are making it sexier than ever though. This pleases me greatly.)

I suspect it will not surprise you, then, to learn that the first recipe I tackled from the Great British Food cookbook was for coronation chicken. I knew the second I laid eyes on the recipe that I had to try it. There were obstacles though, and that's why it took me nine months. First of all, like some of the recipes I'd seen before, the list of ingredients was endless (twenty-six in all). Second, it called for poaching a whole chicken. A bit much for a curried chicken salad, right?

Poached

Finally, it called for 300 mL of mayonnaise. That is well over a cup of mayonnaise. The recipe is supposed to serve only 4-6 people as a main course and also calls for butter, heavy whipping cream, and thick Greek yogurt. While I like me some rich food, my memories of coronation chicken sandwiches didn't involve such heft. I had to lighten it up a bit but was nervous to mess with a recipe from such accomplished, brilliant chefs - chefs who are devoted to making Great British food as Great and British as possible. On the other hand, I thought, condiments are a big deal in Britain, and British kitchens have a thing for odd saucy novelties (salad cream, brown sauce, and bread sauce, to name a few), and I hate condiments generally, so maybe a less-saucy version of coronation chicken would better serve my palate.

I was right. But I learned the hard way.

So. Because, ultimately, it was really damn good, I am going to share with you the recipe as I made it, barely altering the original (really I only reduced the amount of mayo, increased the amount of lemon juice, added a few non-nut garnishes, and converted the British measurements to American ones). But because hindsight is 20-20 and because this dish ended up even richer on the tongue and heavier on the stomach than I'd feared, I have a few suggestions at the bottom of the post that you might consider before serving it for lunch. That said, I really do hope you serve it for lunch. It's spectacular.

Coronation Chicken Salad

Coronation Chicken
Barely adapted from Great British Food (found online here)
Yield: 6-8 as a (sort of) light dish or 4-6 as a (generous) main course

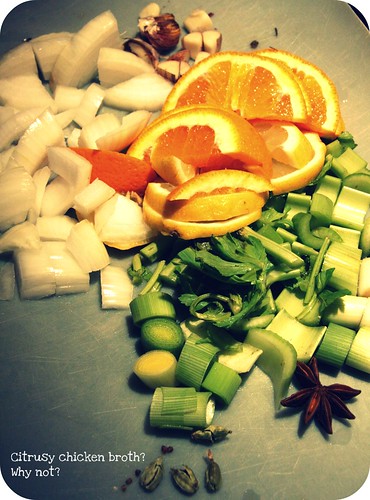
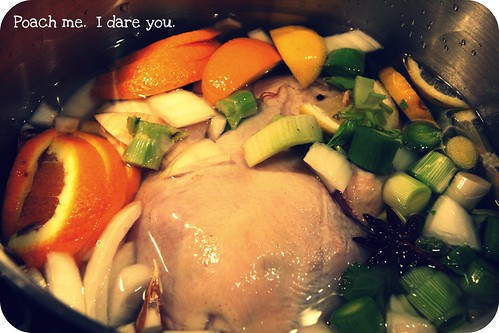
For the poached chicken
1 whole free-range chicken (~4 lbs)*
1 inch piece fresh root ginger, sliced (or 1 heaping tablespoon jarred ginger)
1/2 lemon, sliced
1/2 orange, sliced
1 leek, roughly chopped
2 celery sticks, roughly chopped
1 onion, roughly chopped
1 whole bulb garlic, halved horizontally (no need to peel it)
1 star anise
10 whole black peppercorns
Salt and ground black pepper

For the sauce
1/2 small onion, diced
2 garlic cloves, finely chopped
1 tablespoon finely chopped (or jarred) ginger
2 tablespoons butter
1-2 tablespoons sweet curry powder
6 tablespoons flour
1/3 cup heavy whipping cream
1/4 cup currants, raisins, or chopped dried apricots or cherries
3/4 cup mayonnaise
1/4 cup mango chutney
1/4 cup fresh lemon juice (from 1-2 lemons)
3/4 cup thick Greek yogurt (nonfat is fine)

For serving
Lettuce or bread
Toasted almonds or coconut
Cilantro
Diced apple

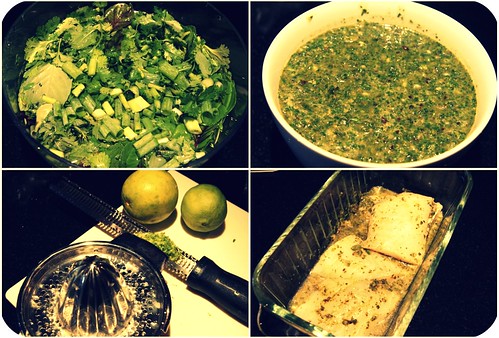
1. Season the inside of the chicken with salt and pepper (stuff it with the lemon rinds from your lemon juice if you've already prepped your sauce ingredients). Place it in a huge saucepan. Add the rest of the poaching ingredients and pour in about a quart of water to cover. Put the lid on the pan. Bring to a boil, then reduce to a very gentle simmer. Cook for an hour. Remove from the heat and leave the chicken in the broth until cool enough to handle.

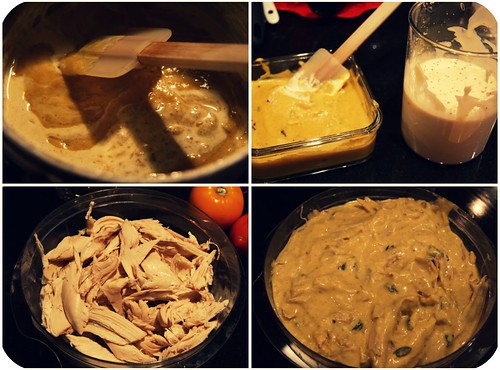
2. Remove the chicken and set aside. Strain the poaching liquid into a clean pan. Bring to a rolling boil and reduce to 2.5 cups. Reserve this reduced stock.**

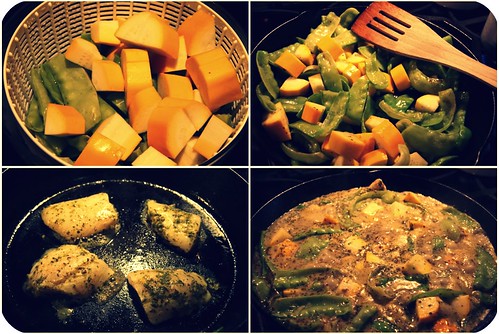
3. Pull the skin from the chicken and discard. Remove the meat, discarding bones and gristle, and tear into thick strips. Set aside in the fridge while you prepare the sauce.

4. Sweat the onion, garlic, and ginger in the butter on medium heat for 5 minutes, until soft. Add the curry powder and cook for 1-2 minutes, stirring, then mix in the flour to make a roux. Add the reduced stock** and bring to a simmer, stirring constantly. Stir in the cream. Pass through a fine sieve, then add the dried fruit and allow to cool.***

5. Using a handheld immersion blender or a regular blender, mix the mayonnaise, mango chutney, lemon juice, and Greek yogurt until well blended. Combine this with the curry sauce base until well mixed.*** Add the cooked chicken, toss to coat, cover, and chill.****

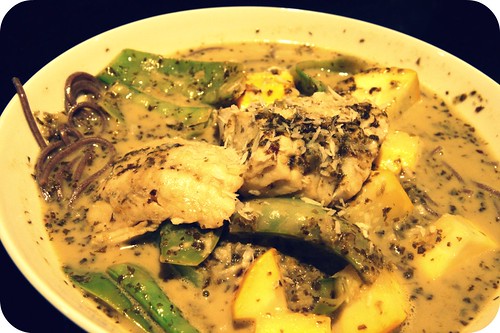
6. Serve the chicken salad on a bed of lettuce with some of the garnishes listed above, or as a sandwich filling on a mild-flavored, sturdy white or wheat bread.
-----------------------------------------

Okay. Here's the deal:

* I think the chicken could be increased by fifty percent. Next time, I will poach two chickens and use as much of it as needed to make a somewhat lightly-dressed chicken salad. (Note to self: get a pan that will accommodate two whole chickens.) (Super short cut: use 3 lbs of boneless, skinless chicken breasts or thighs, poached for 20 minutes instead of an hour.)

**I do not think the reduced poaching liquid is integral to the success of this recipe, particularly because the sauce is so thick. I wouldn't bother reducing the poaching liquid again. I'd simply reserve 2.5 cups of the broth once the chicken has cooled and proceed with the recipe as written.

*** I don't think the onion, garlic, and ginger used in the curry base should be discarded. Next time, I'm going to hold off on adding the dried fruit to the warm curry base; I'll blend the curry base with all the other sauce ingredients and then stir in the dried fruit, right before dressing the chicken.

**** I added some chopped scallions and diced celery with the chicken. I'm American and I like a crunch in my chicken salad.

Monday, September 12, 2011

Simple End-of-Summer Condiments: Roasted Tomato + Oregano Salsa and Herbed Mustard Vinaigrette

Hi. Though it probably hasn't seemed like it if you've been checking this site at all, I am here and alive and eating plenty. I've been cooking a fair amount too. But, as frequently happens towards the end of summer, there's not a great deal of creativity to what I'm making. As the pounds of zucchini and corn and tomatoes and cucumbers accumulate, I stick to the tried and true. (Yes. Those all link to the recipes featured elsewhere on this site that are making a big comeback here a year later.) In my effort to not waste the fresh herbs I've been getting before they wilt and decay (in the plastic bags that I'm sure cut against their long-term survival), I've been chopping them finely and throwing them into salsas, dressings, eggs, tortilla fillings (I made flautas!), and - in a rare moment of ambition - a brine I used to pickle green beans, inspired by Lottie + Doof's escabeche recipe. My two recent favorites are both simple and versatile - a good combination, likely why I've been making them repeatedly since we returned from our August vacation.

The first one: Roasted Tomato + Oregano Salsa. Good with tortilla chips, Mexican food, and eggs... but also REALLY good on grilled chicken or baked salmon, slathered onto a slice of bread or crackers and topped with some thinly-sliced veggies and feta, or even tossed with some pasta and parmesan. It's really good. Just don't skimp on the herbs. Or the salt. Did I mention it's good with tortilla chips?

Roasted Tomato + Oregano Salsa

The second one: Herbed Mustard Vinaigrette. Here's why this one is especially special to yours truly (and oh-so-specially). I don't really do mustard. I don't hate it hate it. Meaning, it's not as bad as the superbads in my book: wasabi, horseradish, goat cheese, to name a few. It's more like green olives or Italian parsley - well-concealed, on a good day, after my taste buds are a bit numb from drinking irresponsibly or overindulging in sugar, I can handle a little. I like dry mustard as a general flavor enhancer and I throw a little dijon in my egg and tuna salads for what I consider "depth". But this dressing really complicates my whole relationship with mustard. It's fairly mustard-forward in its flavor profile, and I can taste that, and I know I shouldn't love it, because I would hate it on a burger or a pretzel... but I do. I just love it. Like, totally. I make it three times a week in the summer and dress lettuce, cucumbers, tomatoes, and blanched green beans with it over and over again. Curious indeed.

Mustard of choiceMustard Vinaigrette

Here are the recipes. I hope you find them as simple and versatile and yummy as I do. And I hope your weather is as lovely as ours has been lately.

Roasted Tomato + Oregano Salsa
Adapted from Epicurious
Yield: about 2-3 cups

1 pound fresh tomatoes, diced (don't peel, seed, or drain; liquid will evaporate in oven)
2 teaspoons olive oil, divided
1/2 teaspoon salt
1/4 teaspoon freshly ground black pepper
1 medium shallot or 2-3 scallions or 1/4 red onion, finely diced
1 small white onion, finely diced
1 small jalapeño, cored, seeded and minced (use half if you don't like much spice)
2 cloves garlic, minced
2 tablespoons chopped fresh oregano

Heat oven to 400°F. Cover a baking tray with foil. Spread diced tomatoes on tray; drizzle with one teaspoon olive oil. Add salt and pepper. Bake until lightly browned and slightly dry, about 15-20 minutes. Remove from oven and toss tomatoes with shallots or scallions or red onion, white onion, jalapeño, garlic and oregano in a bowl. Drizzle an additional teaspoon olive oil over top and serve. This is excellent at room temperature but lasts for at least four days in the refrigerator. (Cautionary note: it gets spicier over time.)

Herbed Mustard Vinaigrette
Adapted from an old Cooking Light annual cookbook (2003 maybe?)
Yield: enough for a side salad for 4 or main salad for 2; easily doubled

1 small (or 1/2 a large) red onion, thinly sliced or diced (a young red onion or shallot is ideal)
1-2 tablespoons chopped fresh basil*
1 teaspoon dried parsley or marjoram
2 tablespoons red wine vinegar or white balsamic vinegar
2 tablespoon olive oil (or use half flax seed oil)
2 teaspoons Dijon mustard
1/4 teaspoon salt
Freshly ground pepper

Whisk everything together. Toss cucumbers, tomatoes, al dente green beans, or a mixture, and allow veggies to marinate in vinaigrette for an hour or so (veggies will last for a few days in refrigerator and are even tastier on day 2 or 3). Alternatively, use as a salad dressing.

*Again, think versatile. Feel to throw in a handful of whatever other herbs you have on hand, e.g. chives, tarragon, parsley or oregano.

P.S. Today my parents celebrate 41 years of marriage. That is v. nearly FOREVER. Well done, mom and dad. Congratulations and much love from our little fam in Minneapolis.

Monday, August 29, 2011

How To Make a Super Fresh Tuna Melt, in Outline Form

I. Fresh is Best.

A. Well. It's true. So opt for fresh tuna if you can swing it. This eliminates both fishiness and tinniness from your tuna salad. Just cook it for a couple minutes on each side in a dry or lightly sprayed pan, put it on a plate to cool a bit, then use two forks to shred it into bite-sized chunks. You probably want at least an 8-ounce piece of tuna to feed your average-sized family.

Fresh Tuna Salad collage

II. Next: chop chop chop!

A. Your efforts will pay off. Chop well.

B. Some key things to chop:

1. Onions of some sort: red onion, shallot, scallion, green garlic, etc.; ideally young if it's the season, minced if you have the energy (but at the v. least "finely chopped")

2. Something crunchy, perhaps one or two of the following: celery, kohlrabi, radish, jicama, Granny Smith apple, pumpkin seeds or almonds, carrot; diced small (see top left photo)

3. Something to accentuate freshness of tuna salad: could overlap with items from one and two, but other possibilities might include cucumber, parsley, chives, basil, tarragon, some hot pepper, or even a little cilantro

III. Pick a flavor profile and go big or go home

A. Umami-style

1. Heaping tablespoonful of one or all of the following:

a) capers
b) chopped cornichons
c) chopped sun-dried tomatoes

2. Accentuated with about a teaspoon of one or all of the following:

a) lemon zest
b) lemon juice
c) red or white wine vinegar
d) dijon
e) finely grated parmesan

B. What I will call California-cuisine-style for lack of better phrase

1. The formula = sweet + tart

2. Sweet

a) Dried fruit of some sort, chopped if not already small, e.g. raisins, craisins, currants
b) Fresh fruit of some sort, e.g. halved grapes, finely chopped figs, apples or apricots
c) A tiny bit of honey

3. Tart

a) Lemon zest or juice or - if you really are going for it - quarter of a lemon, skin and all, seeded and finely minced (or sliced ultra thin and placed directly in sandwich, on top of tuna salad, underneath cheese)
b) Diced cornichons or a spoonful of pickle relish
c) Dash of red wine vinegar or white balsamic vinegar

C. Spice it up, regardless of profile: salt, pepper, red pepper flakes, sweet or hot paprika, a little dried dill or bouquet garni, lemon pepper... a little goes a long way

IV. Consistency is everything

A. No one likes a soupy tuna salad. Go easy on the mayo or mayo alternative.

1. CakeandEdith's favorite mayo alternative: 2 tablespoons plain yogurt + 1 tablespoon olive oil. This should be just enough to keep it all together

2. Special occasion alternative: cream cheese. Seriously. DE-LI-CIOUS.

B. I like a flavorful tuna salad. So I go for a 1:1 ratio of tuna to veggies.

C. Stir everything in a bowl with a fork. Taste and add salt or more seasonings for flavor and a little more oil or yogurt or mayo to get the consistency you like.

V. Bread is the first part of a sandwich that touches your mouth. Choose wisely. Better yet: make it yourself.

VI. Cheese is what makes a melt a melt.

A. So choose something melty.

B. But also flavorful.

C. Suggestions: sharp cheddar, emmentaler, gouda, Jarlsberg, Dubliner

D. Easy does it.

super fresh

VII. Assembly and preparation

A. On a cutting board, line up bread slices. Lightly butter one side of each slice.

B. Place mound of tuna salad in center of non-buttered-side of half of bread slices.

C. Gently flatten tuna salad with back of spoon, so it's almost reaching edges of bread but not quite.

1. Add lemon slices now, if that's your thing.

2. Or tomato slices.

3. Or avocado slices.

D. Layer thin slices of cheese on top of tuna salad (or lemon slices or tomato slices or avocado slices).

E. Top with remaining slices of bread, buttered sides out.

F. Heat cast-iron skillet or whatever you've got over medium heat. Add sandwich and cook for about 3 minutes, or until cheese starts to melt and bread smells toasty. Carefully flip over (I awkwardly use two spatulas for this) and cook for 1-2 minutes more. Cut in half and serve.

VIII. You're so welcome.

IX. I love you too.

Tuesday, August 9, 2011

A Quickie for Nicole: Homemade Lara Bars

Hi! This is going to be so fast! Because I'm only blogging in the fifteen minutes I have while both my babies are sleeping and both my daytime houseguests are on a sandwich run to Be'wiched, the best deli on earth. I really wanted to post this before I go on my vacation and I go on vacation tomorrow.

Yay!

So here's the deal: Homemade Lara Bars. On the interwebs, a lot of people talk about making homemade versions because the real deal ones are pricey. That's really noble and all, but I spend a lot of money on food and have no problems with that in fact, I feel it is the morally responsible thing to do because I think cheap food is cheap for reasons that are not sustainable or possibly inhumane to either animals or migrant workers or the hard-working farmer next door who gets sued - oh wait you don't care about any of this because food is the most important thing to me besides family and friends. I wanted to make a homemade version because the whole tree nut allergy thing limits the selection of Lara bars available to me for purchase. There are tons of recipes online. You can find a list HERE. Mine were adapted from this recipe because they use cocoa and, as a byproduct of my King Arthur's Flour addiction, I have a lot of cocoa.

I used pepitas (a/k/a hulled pumpkin seeds) instead of nuts. They are allegedly a super food.

Pepitas

I also used those coconut-date rolls that you can buy at co-ops and Whole Foods and Trader Joe's because they require a little less of a work-out from your food processor than regular dates do, plus they don't require pitting.

date rolls

These ended up absolutely delicious - loved by the whole family, perfect for a toddler pre- or post-swim class snack or perhaps an airplane ride. The cocoa does present some stain risks though. Don't say I didn't warn you.

finished product

No-Nut Cocoa Lara Bars
Inspired by my man Christian and adapted kind of from this recipe
Yield: 10 bars (about the same size and shape as the brand-name ones)

Note: I used a scale, but am sharing my approximations in case you don't have one. It's a forgiving recipe, just eyeball it.

1. The night before, if you want: soak 200 grams (about 1.5 cups) pepitas in cold, filtered water in refrigerator for 8 hours. Rinse and allow to dry on a towel in a single layer.

2. Pulse the pepitas in a food processor until finely chopped.

3. Add the following and pulse until sticky and mixed:

400 grams (about 2-3 cups) coconut-date rolls
4 tablespoons cocoa powder
1/4 teaspoon cinnamon
1/8 teaspoon salt
Water, one teaspoon at a time, if necessary

4. Line a 9X9" pan with foil.

5. With wet hands, press the mixture into pan.

6. Place in freezer for at least an hour.

7. Carefully remove whole concoction from pan, put on cutting board, and peel off foil. Cut into rectangles, wrap individually in plastic wrap, store in freezer.

8. Yum!

Friday, August 5, 2011

Green Beans and Pluots! Why not?

[I am either reminded of or inspired by (or both) the poster in Murray's office on Flight of the Conchords that says: "New Zealand! Why not?" So funny.]

So we're up to our ears in green beans lately.

[TANGENT: I wish I could have said "we're up to our ears in corn" instead because that would have been really punny. But we're not. No corn yet from our farm, although I did have a nice cob all to myself at the downtown Minneapolis National Night Out celebration on Tuesday. I always think I don't really like corn until I eat it. It's tasty and gets me to floss my teeth.]

But alas.

Green beans. Not corn.

I always think I do really like green beans and then I eat them and I am right. They take a few more steps to make than I usually remember - I always clean and trim and blanch and ice-bathe them (okay, wait, actually this time I didn't ice-bathe them) - and in the middle I'm like, "ugh, green beans, I hope they are still worth all this" and then they are. Such rewarding little skinny green things. Mild enough to go with pretty much anything, yet flavorful enough to hold their own. Maybe you should try them with pluots. They make an attractive pair, even when I only have an iPhone with which to document their union.

iphone green beansgreen bean salad

Green Bean Salad with Herbs, Cucumbers, and Pluots
Yield: 2-3 servings; easily doubled
Adapted a lot from Williams-Sonoma Essentials of Healthful Cooking (which is a really great cookbook, FYI)

1/2 pound fresh green beans, rinsed and trimmed
1/3 cup minced fresh herbs: mint, cilantro, basil, chives, tarragon (the mint really makes this wonderful! might be imperative!)
1/2 sweet onion or whole shallot, thinly sliced (ideally a young onion like the kind at farmer's market this time of year)
1 tablespoon olive oil
1/2 teaspoon salt, divided
Freshly ground pepper
1 cucumber, halved and thinly sliced
1 pluot or other stone fruit, pitted and sliced thin
1 teaspoon red wine or balsamic vinegar

Fill a 2-quart saucepan half full with water, add 1/4 teaspoon salt, and bring to boil. Add the beans to the boiling water and cook until tender, about 5 minutes. Drain.

In a serving bowl, combine the hot beans with your fresh herbs, olive oil, sliced onion, and 1/4 teaspoon of salt. Season with some pepper. Set aside to cool for 15-20 minutes.

Meanwhile, prepare your cucumber and pluot. Just before serving, add them to the green beans mixture, drizzle with the vinegar, and toss gently. Taste and add more salt and pepper and vinegar if desired. Serve at room temp, or chill and eat cold.

Monday, August 1, 2011

Granola-Crusted Banana Pancakes

Hi! This is kind of a random post - and the single afterthought-of/excuse-for a picture is way lame -

banana pancake

and I don't have anything deep, meaningful, clever, or amusing to say about the recipe I'm sharing.

And yet.

It's SO worth sharing.

Picture it. Sunday morning: Whole family's hungry. Lunch plans are in place for noon. It's 9 a.m. I am aching to try out the whole wheat granola waffles recipe from Marion Cunningham's The Breakfast Book. I pull out my ingredients. MC plugs in the waffle iron. I skim the recipe. There is soaking of granola involved - I hadn't noticed that before. My tummy grumbles. MC reminds me of our timeline. My toddler screams: "Pancakes!"

Good idea, little one.

And thus were born some of the tastiest pancakes that have ever graced our kitchen, taste buds, and bellies. Notwithstanding haphazard presentation (see "afterthought" shot above), we're talking oh-dang tasty. With a delectably uncommon crunch. Blog-worthy indeed. Get to it, kids. These are fo-sure crowd-pleasers.

Granola-Crusted Banana Pancakes
Adapted from here
Yield: 3 servings (could be easily doubled or tripled)

1 cup whole wheat pastry flour (spelt, kamut, all-purpose, barley flours would all work here too)
3 teaspoons baking powder
1 teaspoon cinnamon
1/4 teaspoon ground nutmeg or ginger or both (optional)
1/4 teaspoon salt
3/4 cup vanilla soy milk (or any kind of milk + 1 teaspoon vanilla + 2 teaspoons sugar, honey, or maple syrup)
2 tablespoons olive oil or melted, cooled butter
1 egg
1 banana, thinly sliced (grated apples or sliced peaches would prob be good too)
1/3 cup granola (ideally without dried fruit)
1 tablespoon butter or oil for griddle

Whisk together dry ingredients. Add the milk, oil or butter, and egg and stir with a spoon or fork until just combined, a few lumps are okay. (If the mixture is too thick for you, add a tablespoon or two of water or milk. I like thick pancakes.) Heat 2 teaspoons butter in cast iron skillet (or whatever you use to make pancakes) over medium heat. Once bubbling a little, drop 1/4-cup scoops of batter into the pan. Working quickly but carefully, drop 3-4 slices of banana on each pancake and then top with about 2 teaspoons granola. Flip once 12 bubbles form (my mom's tip) (about 2-3 minutes), cook on other side for another 2 minutes. Once finished with first batch, add another teaspoon butter or oil to pan and repeat. Add a third teaspoon of butter if you need a third round.

Serve with maple syrup and more butter. (Or eat plain if you are starving and are on Weight Watchers, like me. Which reminds me: 9 points per serving, counting butter on griddle but not on cooked pancakes.)

Tuesday, July 19, 2011

How many times can I use the word "fragrant" in one post? - Jamie-inspired Fragrant Green Curry

Jamie Oliver includes a wonderful "Fragrant Green Curry Chicken" recipe in The Naked Chef. It's more Thai than Indian, v. fresh and unequivocally fragrant, has a bit of a kick, and tastes like pure summer. I made it a long time ago, loved it, and never made it again.

Here's why: the recipe calls for a substantially long list of ingredients, some of which are kind of obscure in these here Midwestern parts (albeit super fragrant!), most notably lemon grass and kaffir lime leaves. These (fragrant!) items are hard to find in Minneapolis and I recall them being quite costly once I did get my hands on them (unlike the obscure dried ingredients I've hunted recently, which have been alarmingly cheap). Admittedly, the curry was so delicious, it was totally worth it. But maybe just the one time. Jamie's fragrant green curry, as amazingly fragrant and green as it was, not to mention refreshingly easy to prepare, just couldn't be an everyday meal in our home.

Then it was July 2011. Yesterday in fact. And I had a nice filet of cod thawing in the refrigerator. And I had oodles of patio-grown cilantro and spearmint and basil begging to be rescued from the crazy heat wave we're barely surviving and thrown together into something tasty and summery and ... fragrant. I thought about Jamie's green curry wistfully. And then I thought: these are some good herbs; I bet these herbs - along with some funky freestyling and practical substitutions - could yield a comparably decent, threateningly fragrant curry. With cod! And snow peas from my CSA. And some beautiful yellow summer squash from my grandmother-in-law.

And I was totally right.

it's true i'm fragrant

This curry is absolutely divine.

green curry collage 1green curry collage 2bowl-o-curry

Jamie-inspired Fragrant Green Curry (with Cod and CSA Vegetables)
Inspired by none other than The Naked Chef
Yield: 4 servings

For curry paste:
1-3 medium-spicy green chillies, seeded (I used one jalapeño and my toddler could handle it, so use more if you want some noticeable heat)
2 cloves garlic, or 3-4 garlic scapes
3 large handfuls of cilantro
2 large handfuls basil
1-2 large handfuls of spearmint
[Optional: another handful or two of other fresh herbs you might have, e.g. chives, oregano, lemon balm, stevia, peppermint, citrus leaves, parsley]
About 1/2 cup chopped onion (I used a couple scallions + half a small yellow onion)
Heaping tablespoon of fresh(ish, i.e. jarred) ginger
1/2 tablespoon ground coriander
Zest of 3 limes + juice of 2 limes*
Zest and juice of 1 small orange*
1 teaspoon table salt
1 tablespoon olive oil

For curry:
1 tablespoon olive oil
1 large yellow squash or zucchini, chopped into 1" chunks
1 pound green snow peas, trimmed
1 pound cod, boned and skinned, cut into 4 pieces
1 14-oz can full-fat coconut milk
Handful of unsweetened flaked coconut for garnish (optional)

*You don't want more than about 1/2 cup juice - it will end up too soupy.

Put all the green curry paste ingredients in a food processor and pulse a few times to chop, then whizz until you get a relatively smooth green paste. Using about half a tablespoon of curry paste per piece of cod, coat the cod in the paste and allow to marinate at room temp for about 30 minutes.

In a large wok or cast-iron skillet or whatever you have, heat the tablespoon of olive oil over high heat and add the vegetables. Saute, stirring occasionally, until just tender, about 5 minutes. Put cooked vegetables into a bowl and cook your fish now - about 2 minutes per side over high heat. Add the remaining green curry paste to the pan (stand back, it will sizzle and spit), and then stir in the coconut milk. Return the vegetables to the pan. Bring everything to a boil and simmer gently for about 5 minutes. Season with some more salt and pepper to taste. Serve over rice or noodles or some mashed sweet potatoes, garnish with some fresh cilantro and the flaked coconut. Have a cold beer.