Tuesday, January 31, 2012

Sweet Potato Phyllo Pastries

For Christmas I got that cookbook I raved about here and here. This doesn't mean that I'm decreasing my trips to the library - heck no, with unheard-of high temps here in Minneapolis we are getting our walk on as often as possible and the library is one of our four main destinations! - it just means that I'm checking out one less cookbook and way more teen fiction. Sometimes I can't tell what makes teen fiction teen fiction. Do you still respect me?

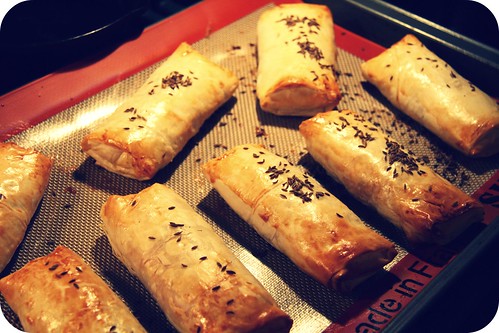
But, hey, about these phyllo pastries! They are excellent. And the phyllo at my co-op is spelled "filo". That's funny, right?

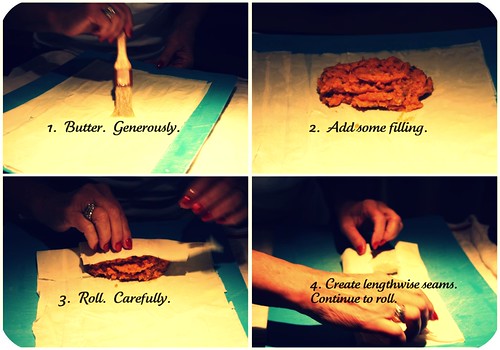
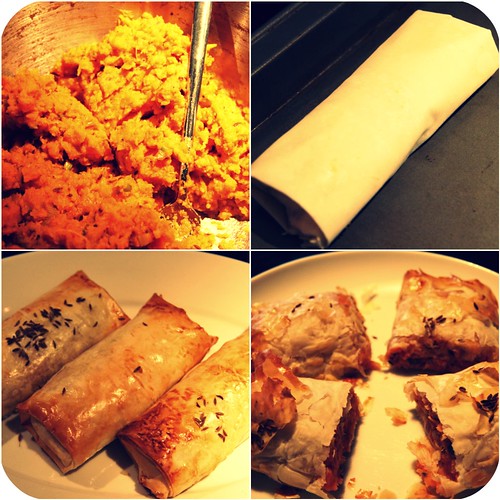
Before making these - and I'll just be honest here and clarify that by "making" I mean "co-making" because really I did the filling (easy part) and my mom did the rolling (hard part) - I was really intimidated by phyllo dough. It's finicky stuff. But my mom made it look so easy. They're like burritos, only filled with delicious sweet potatoes. And sort of glamorous. Here's how she did it:

Sweet potato how-to collage

And they ended up so beautiful at the end - fit for important company, indeed! Make them!

finished roll-upssweet potato roll-up process

Sweet Potato Phyllo Pastries
Yield: 6-8 pastries

2 large sweet potatoes, peeled and cubed (about 1.5 lbs)
1 tablespoon butter
1 bunch scallions or 1 large shallot, thinly sliced
2 1/2 teaspoons cumin seeds
1/2 teaspoon sweet paprika
1/2 teaspoon salt, plus more for sprinkling
1/2 package phyllo sheets, thawed
about 1/4 cup melted butter, for brushing phyllo
1 egg, beaten

Preheat oven to 375 degrees F.

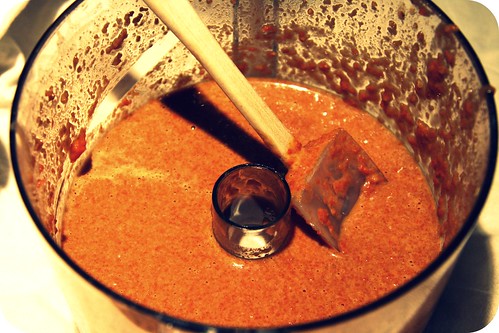
Steam, roast, or boil sweet potatoes until soft. (A microwave works!) Coarsely mash them.

Heat the butter in a skillet and saute the scallions and 2 teaspoons cumin seeds until fragrant, about 1 minute (if using shallots, cook for about 3 minutes, adding cumin seeds for the last minute). Add the warm sweet potatoes, paprika, and 1/2 teaspoon salt, stir with a wooden spoon until combined well. Allow mixture to cool.

Keep the thawed phyllo pastry covered with a cool, damp towel while you prepare your work space. Have melted butter and a brush ready. Place one sheet of phyllo pastry on your work surface and brush with melted butter. Working quickly, place another sheet of phyllo on top of the first and brush with butter. Repeat until you have about four sheets of phyllo stacked. Spoon a half cup portion of the sweet potato mixture and place along the bottom edge of the stacked phyllo. Roll away from you like you'd roll a burrito. Once the sweet potato filling is enclosed by the phyllo and you have rolled about a third of the way down the length of the phyllo sheets, gently fold in the sides (see picture above), and continue to roll. Repeat this process with remaining phyllo and sweet potato mixture; there will be about 6-8 pastries in total.

Arrange the pastries on a baking sheet, brush with the beaten egg and sprinkle with remaining 1/2 teaspoon cumin seeds and a little coarse salt. Bake for 10-12 minutes, until golden. Cut in half if you'd like and serve warm.

These were excellent leftovers as well: I microwaved them until warmed through (about 1 minute for one pastry) and then broiled them for another minute or two until crisped.

Saturday, January 21, 2012

Cook for the Week Bonus: Roasted Butternut Squash Pasta Bowl with Chunky Herbed Tomato Sauce and Christmas Lima Beans

Dear Chris, CJ, Jess, Jason, Ryan, Alice, Charlotte, Emily, Monica, Kelly, Katie 1, Kelsey, Mike, Aimee, Tracy, Molly, Jennifer, Katie 2, Becka, and Rachel*,

Thanks for that awesome class on Wednesday! I had a great time. It seemed like you did too. I hope you weren't faking it and I hope to see you again at another class. I learn a great deal from you fabulous class participants every time I teach. On Wednesday, I learned that taking time in the beginning to connect with each individual participant makes for a lot more intimate, interesting class. Getting more specifics from you about what you hoped to take away from the class helped me stay focused and organized. Thank you for opening up, thanks for the positive feedback, thanks for having fun, and thanks for the best class participation I've experienced yet! Spending three hours with you, ladies and gentlemen, expert Cooks for the Week, quesadilla-makers extraordinaire, was nothing short of absolutely lovely. Thank you thank you thank you!

To follow up on what we covered in class, I wanted to include in this post two things: (1) some less off-the-top-of-my-head, more comprehensive information on poaching chickens and making your own stock; and (2) a recipe that I put together for lunch this week using some of the components of our cook-for-the-week curriculum, as well as some other made-ahead items, that ended up so flavorful and interesting that you'd never have guessed it was a hodgepodge meal.

Roasted Butternut Squash Bowl collage

First things first: chicken stock. The perfect "recipe" for chicken stock, in my opinion, is that found in Alice Waters's The Art of Simple Food. It basically goes like this: place 1 whole chicken and 1-1.5 gallons cold water in a stock pot. Bring to boil and then add 1 carrot, a rib or 2 of celery, 1 onion halved, 1 head of garlic cut in half, 1/2 teaspoon black peppercorns, salt (I suggest starting with one tablespoon and adding more to taste once you are using the stock in a soup or other dish), and a bouquet garni of parsley and thyme sprigs and a bay leaf. Simmer for 4-5 hours. Strain and store in refrigerator for a week or freezer for a few months.

As I mentioned in my class, in addition to adding about a cup of white wine or 1/2 cup lemon juice (and the lemon rinds!) per gallon of water, I take a more anything-goes, resourceful approach, appreciating the flavor and aroma variations that grace our dinners depending on whether I've thrown in butternut squash peel and pith or some cilantro that didn't manage to get used at its peak. (I literally save these food odds and ends in a bag in my freezer to throw into my next batch of stock.) Some items that influence the flavor and depth of broths more decisively are the following: dried mushrooms, citrus rinds, star anise, whole cloves and/or cardamom pods, root vegetables, fresh herbs, and ginger (to name a few). Anything roasted - the Thanksgiving turkey's carcass or a couple heads of garlic - will impart a smokier, heartier flavor to your broth.

To get some chicken out of this process, remove the whole chicken once it's cooked through - about an hour if it was fresh or thawed and about 90 minutes if you started with a frozen whole chicken - allow to cool a bit, peel off the skin, and then shred the chicken with forks or your fingers. Return the skin and the bones to the pot if you want to continue making a rich broth and simmer for another 3-4 hours.

If you'd like to avoid touching raw meat altogether, just use a rotisserie chicken (or make vegetable stock instead). Start with the whole chicken for a really flavorful stock. Using just the carcass, however, will still make a decent stock, especially if you've got a good mix of aromatic vegetables and herbs in the pot.

I hope you'll all make stock soon and let me know how it goes. If it doesn't have as much flavor as you'd like, add salt 1-2 teaspoons at a time and keep tasting. Adding a little bouillon isn't cheating either. Our American palates are used to salty, rich broths.

And now to the roasted squash-pasta bowl. It's such a unique combination of flavors - the sweetness of the squash, the earthiness of the whole grain pasta, the tartness of the tomato sauce, and the creaminess of the chestnut-like Christmas lima beans all at play together form something really special. I wish you could be here to try it. But instead, here's a bite for you to look at.

A spoonful of deliciousness

Sorry about the weird shadow. Let's call it artsy and enjoy our lunch.

Butternut Squash-Pasta Bowl with Chunky Herbed Tomato Sauce and Christmas Lima Beans
From yours truly
Yield: 4 servings

1 small butternut squash, peeled and cut into 1/2" cubes
olive oil, salt and pepper
1/4 pound whole wheat spaghetti or other pasta (a nice handful)
2 cups cooked butterbeans, lima beans, Christmas lima beans, or other large creamy bean
2 cups chunky herbed tomato sauce* (homemade ideally)

Preheat oven to 400 degrees. Toss cubed butternut squash with 2 tablespoons olive oil and some salt and pepper on a baking sheet. Place in the oven and roast for 20-30 minutes, until just browning and softened. Meanwhile, cook pasta according to package instructions and drain well. In each of four bowls, place 1/2 cup cooked pasta, top with 1/2 cup tomato sauce, followed by 1/2 cup beans and finally a quarter of the roasted squash. A sprinkle of nice parmesan would be a lovely addition as well.

I had all these ingredients except for the pasta in my refrigerator after a weekend of embracing "Cook for the Week" methods. I boiled the pasta, threw this together, and quite impressed myself. I hope you do the same! xoxo

* I hope I'm not forgetting anyone and/or not getting anyone's name wrong. The chunky herbed tomato sauce I used was the one I made with my Cook for the Week class on Wednesday. It's perfect in about a hundred different ways and works beautifully in countless dishes. And yet it hasn't appeared on this blog yet! It will. But it deserves its own post. Once I get to it, I'll update this post with a link. In the meantime... your favorite marinara, purchased or homemade, should do the job nicely.

Saturday, January 14, 2012

Simple, Subtle, and Surprisingly Delightful: Orange-Scented Cauliflower Soup

Tonight I got to go on a date with my husband and our friend Rita. It was so nice. She's an old friend of ours. She's known MC for at least twelve years and I appropriated her as my own friend almost ten years ago. (Which is nuts, btw - ten years!? Where does the time go?) We've always gotten along well but our friendship took on a new level of intimacy when we became mothers at about the same time. (New mothers, you see, have everything in common.) I see Rita often, always with our two toddler girls in tow. Rare, however, is the opportunity for MC to spend time with her, and even rarer is the opportunity to talk sans children, while eating delicious food that we didn't prepare ourselves, accompanied by wine. Tonight was a treat. As visits with dear old friends often are, it was just nice. Mellow, easy, and comforting.

Sort of like this soup.

I've posted another recipe for cauliflower soup on this website. It was a cauliflower bisque with a complex, flavorful acidity reminiscent of buttermilk (but it was vegan). When I wrote about that bisque I noted that I'm not a huge cauliflower fan but the complex flavors in that soup sort of defied - masked? - any cauliflower-ness, and I even felt when I posted about that soup that it could have been made - improved? - with a different vegetable.

This soup is simpler and more decidedly cauliflowery. And yet I loved it. Not sure if the butter and citrus brought out a new dimension of flavor in the cauliflower than I've encountered before, or if I've merely developed a taste for cauliflower in the last year. Regardless, this soup is just lovely. The egg yolks make it custardy and rich, and the addition of corn starch as a thickener gives it a velvety texture that's hard to master in a typical blended soup. The citrus tempers the richness, giving it a brighter flavor and drawing out the natural sweetness of the cauliflower. Round it out with a bit of salt and a big knob of butter and, well, you've got yourself some perfect mid-winter comfort food.

Enjoy.

Orange-Scented Cauliflower Soup
Adapted from I Know How to Cook
Yield: 4 servings

One medium head of cauliflower (about 1.5-2 lbs), broken into florets
One orange, juiced
4 cups vegetable or chicken broth
1/4 cup cornstarch
2 egg yolks
2 heaping tablespoons butter
Salt and pepper, to taste

Optional garnishes: freshly grated nutmeg or a dash of paprika

Place broth, 2 cups of water, and orange rind into a large pot and bring to boil. Add the cauliflower and cook until softened, about 15 minutes. Using a slotted spoon, remove the cauliflower and place in a blender or food processor and blend until smooth. Reserve the cooking liquid in a separate container and discard the orange rind. Pour the cauliflower into the soup pot and stir in cornstarch and then the orange juice. Add back to the pot enough cooking liquid to make a desirable soup consistency (I used 4 cups; err on the side of too much liquid as the soup will thicken upon cooking). Whisk together and bring mixture to boil. Simmer gently for 10 minutes. Turn off heat and whisk in egg yolks until fully incorporated, and then stir in the butter. Salt and pepper to taste.

Saturday, January 7, 2012

Happy New Year. Resolutions. Quick Dinners. Noodles with Garlicky-Carrot Sauce.

Happy New Year! Seeing as it's the last day of the first week of the new year, and one of my resolutions this year is to carve out time to post on this website at least once a week, I figure I'd better get cracking. So hi! How are you? Hope all's well.

I love this blog. I love the food I make that I deem worthy of sharing on this blog. I love that people read this blog and try the things I suggest and sometimes find my attempts at half-cleverness endearing if not entirely amusing. But, quite frankly, now that my second baby is mobile and curious and unexpectedly agile, and my first baby continues to be so compelling and extroverted, and they don't ever nap at the same time anymore, I'm lucky to get a decent dinner on the table most days. It's not that I'm busy. I feel like the word busy connotes having to do lots of things or be lots of places, and it's definitely not that. I just spend a lot of time sitting with the loves of my life on our family room rug (the safest place in the house for cruising babies and accident-prone toddlers), reading picture books, patty-caking, preventing injuries to the best of my ability. When I have an opportunity that doesn't involve tending to my children, I prioritize working on my cooking class materials, because I am new at it and need to work hard to become great. How do all those other bloggers do it all? I stumbled upon one recently whose author has NINE children - 4 biological, 5 adopted - and she home schools them all and cooks and has written two books and right as I was about to leave her site because it was making me feel like an enormous failure I noticed a section about marathon training. Because in her spare time she RUNS MARATHONS and then WRITES ABOUT HOW. These people aren't real, right? They just can't be real.

Yikes. That was an embarrassing tangent.

And you probably don't want to hear my excuses anyway.

I just wanted to explain that I love this blog and it gives me a great deal of pleasure and fulfillment and I am going to try to be more organized and methodical in 2012 so hopefully you'll see more regular posts. One approach I'm taking is to try to accept that much of what I have to offer stems from my abilities to cook resourcefully, quickly, and healthily. Teaching people with varying levels of kitchen experience has made me appreciate these skills even more. So you might see a greater emphasis on every day cooking here. Bear with me. There might be an awkward phase.

I thought this simple - ZIPPY - recipe would be a good starting place, and here's why: one evening, my husband and I had tickets to go see a concert or play or something. My mother-in-law was coming over after work to babysit. I like to have dinner available for babysitters or anyone really who happens to be in our home at dinner time, but it had been a rough day and I hadn't been to the grocery store in a while and I was momentarily at a loss as to what to make. (Enter resourcefulness.) Also, it was late. (Enter quickness.) This was the week after Thanksgiving and I really wanted both my children and their grandmother to have something nutritious and "light", given the previous weekend's decadence. (Enter healthy.)

Let's skip to a moral real quick, before I forget: don't underestimate the value of a well-stocked pantry. In a pinch, it can really save you.

I think another blog's "link love"-type list led me to Not Without Salt. The post I stumbled upon had "quick" in its title so it piqued my interest. I didn't have most of the ingredients and wanted more vegetables in the meal... but it was inspiration enough to get a pot of water on the stove to boil while I peeled garlic. My mother-in-law and daughter both enjoyed it that night and I devoured two huge servings of it the following day. Upon finishing, I was sad there wasn't more.

Carrot-Tahini Sauce
Plated Noodle Bowl

So. Nothing fancy. But a memorable weeknight meal doesn't really need to be fancy. It just needs to have a good balance of tasty, quick, easy, and healthy. Easily attainable with practice. And a hefty dose of garlic.

Note: I'm a raw garlic lightweight. I used four garlic cloves and, to me, it bordered on mouth-on-fire garlicky. I kind of loved it but, again, spend most of the day sitting on the floor with my kids, neither of whom seems to have a demonstrated sense of smell. So eat at your own risk. That said, I think it's a risk worth taking.

Quick Garlicky-Carrot Pasta
Fueled by a poorly stocked kitchen but well stocked pantry...
Inspired by this Not Without Salt post and the leftover cooked carrots in my refrigerator...
Enjoyed by three generations of garlic-loving Camerons
Yield: 3-4 servings

For garlicky-carrot sauce
3-5 garlic cloves (depending on how brave you are)
3 tablespoons tahini or peanut butter
1/3 cup soy sauce
2 tablespoons brown rice vinegar
1 tablespoon mirin (or honey)
1 teaspoon honey (or mirin)
2 teaspoons toasted sesame oil
1 carrot, any size, steamed or raw, chopped into 1" chunks

For pasta
1/2 lb spaghetti or soba or whatever
1-2 cups frozen edamame

Optional veggies: more carrots, spinach, peas, bean sprouts
Optional garnishes: avocado, sesame seeds or peanuts, chopped cilantro, lime wedges

Bring a pot of salted water to boil. Add the noodles and frozen edamame to the water, return to a boil, and cook for 7 minutes, or according to package instructions.

Meanwhile, in a food processor or blender, pulse the garlic cloves until finely chopped. Add the remaining sauce ingredients and mix until blended.

Drain the noodles and edamame, reserving about 1/2 cup of cooking water. Place in a serving bowl and drizzle with as much sauce as you'd like. Toss gently, add a little cooking water if you want a thinner sauce, throw in whatever other vegetables you have (avocado really adds a nice creaminess to the dish), and sprinkle with sesame seeds or peanuts. A squeeze of lime or lemon juice is nice too.

Voila. Dinner in twenty. Happy 2012.