Dear Nicole,
So, I totally kept my word. This is something I try to do on a regular basis but sometimes I forget or get lazy or my children exist (and, well, you've met them). It is easier to keep my word when it involves my new favorite thing: the doughnut pan.
Which reminds me! Hey! True story: "Mom, I am allergic to peanuts, right?" "Yes. You are allergic to peanuts and I am allergic to tree nuts. So we don't eat nuts in our house." "But I am not allergic to all nuts, right?" "We don't really know." "But, like, I am not allergic to doughnuts, right?" "Right." Accompanied by much laughter, naturally.
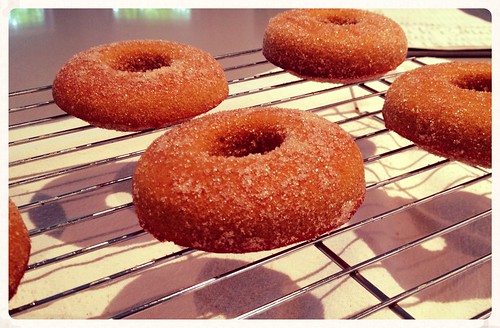
On a more serious note though, I think, seriously, that you (and maybe everyone) need(s) a doughnut pan. I especially think that gluten-free bakers need doughnut pans. They are a recipe for success. Because, here are some things that help with gluten-free baking: short cooking times, small items, eating baked goods day-of. Cookies and muffins? Great gluten free options. Cakes? Well, sometimes, depending on what other restrictions you might have. Pastries, pies, bread? Trickiest of all. Bring on the eight thousand ingredients. Baked doughnuts, I am happy to report, are basically muffins with a nice firm exterior. Think muffin top. But muffin top on top and bottom. Win-win. They bake in 15-20 minutes, they taste best on the first day but that is true of all doughnuts really, and I am fairly certain they are full-proof. Also, they are crazy-go-nuts good.
I adapted this recipe just barely from a woman named Jeanine whose blog is called The Baking Beauties. She is from Canada and she has done A LOT of work for you. I think she should be your go-to source for standard baking recipes made gluten-free.
You can go now. Because I think you need to get yourself a doughnut pan. Miss you.
xoxoxo
E-NC
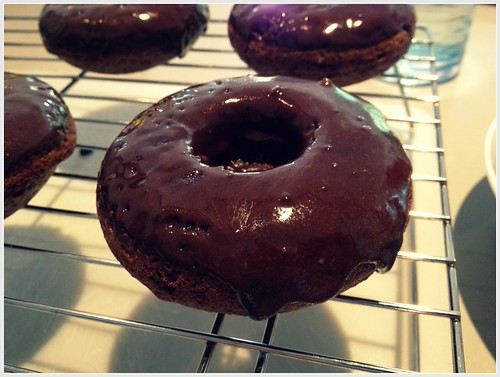
Gluten-Free Chocolate Doughnuts with Coconut-Chocolate Glaze
Adapted from Baking Beauties
Yields: 6
Doughnuts
3/4 cup sorghum (that's what I used) or brown rice flour*
3 tablespoons tapioca starch*
1/2 teaspoon xanthan gum*
1 teaspoon baking powder
1/2 teaspoon salt
2 tablespoons: dry instant chocolate pudding mix, dry milk powder, or whey protein powder**
3 tablespoons cocoa powder
1/2 cup sugar
2 large eggs
1/4 cup oil (I used melted coconut oil)
1/4 cup milk
1/2 tsp apple cider vinegar
Frosting
1 cup powdered sugar
2 tablespoons cocoa powder
2 tablespoons coconut oil or butter
1-2 tablespoons milk or water
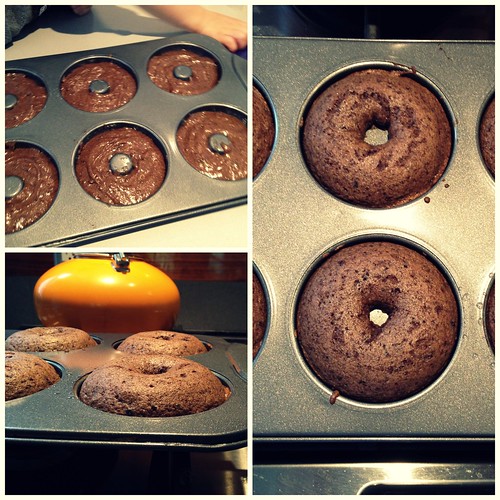
Preheat oven to 375° F. Lightly grease a doughnut pan.
In a large bowl, whisk together all of the dry ingredients. I recommend sifting cocoa powder into the bowl to avoid lumps. In another bowl, mix the wet ingredients. Pour wet ingredients into the flour-cocoa mixture and stir until fully combined. Spoon mixture into prepared doughnut pan: aim for 3/4 full. Bake in preheated oven for 10-12 minutes, rotating pan 180 degrees after 6 minutes, or until a toothpick inserted into the thickest part of the doughnut comes out clean.
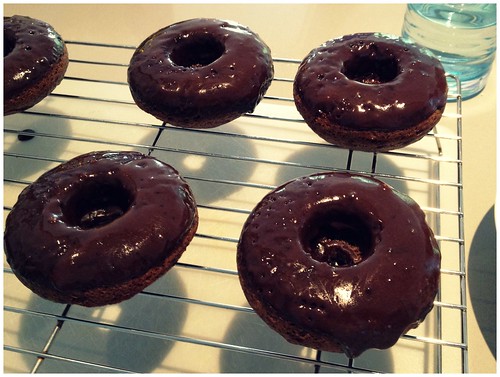
Let doughnuts sit for 5 minutes before turning them out onto a cooling rack. Allow to cool completely (20-30 minutes was sufficient) before frosting.
When ready to frost: Stir together the powdered sugar, sifted cocoa powder (sifting really is a helpful step here), butter or coconut oil, and enough milk or water to make the glaze the consistency you want. Dip your cooled doughnuts into the glaze and place on cooling rack until frosting firms up a bit. I dipped my doughnuts three times in the glaze to get them as shiny and evenly-coated as I wanted. There was more than enough frosting to do this.
* 1 cup less 1 tablespoon of whatever gluten-free baking mix you have on hand will work in place of the flour and starch in this recipe. Use the xanthan gum only if your baking mix doesn't include any. You can also substitute potato starch, arrowroot, or cornstarch for the tapioca starch.
** Jeanine consistently uses pudding mix in her recipes. I imagine, based on my use of milk powder in conventional baking, that this makes for a more *tender* (ew!) texture. I didn't have milk powder or pudding mix in my kitchen, so I used some whey protein powder and evidently it worked fine, since I think these doughnuts are perfect. Comments on the Baking Beauties site indicated that a tablespoon more of cocoa powder + 1 tablespoon of flour works fine too, just to even out the dry-to-wet ratio. Maybe *tenderness* (ew!) is compromised, but they will still be doughnuts.