Monday, February 27, 2012

Because I Owe You Something Magical: Triple Chocolate Tart

Hello gorgeous!

whole tart

1. I am so tired.

2. You don't really want to hear about that. (Oh, you do? Click here then.)

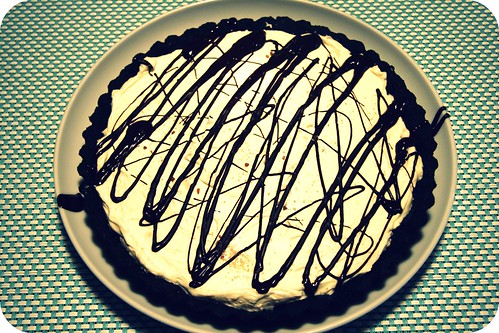
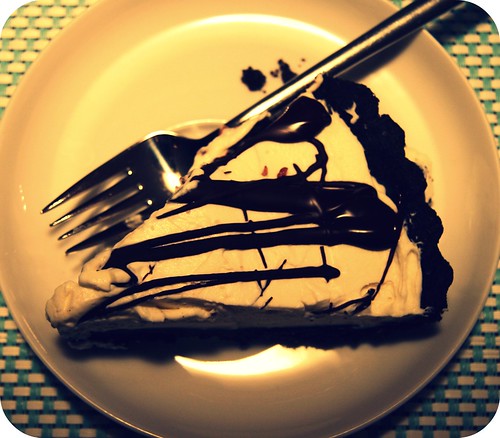
3. This tart is so freaking decadent and delicious, and, if I may say so myself, I feel my pictures do such a good job showing off said tart's unequivocal company-worthiness, that any text other than the recipe in this post would be pointless.

4. Particularly since I am tired so it would likely be boring and/or rambly anyway.

5. Here are those pictures I mentioned.
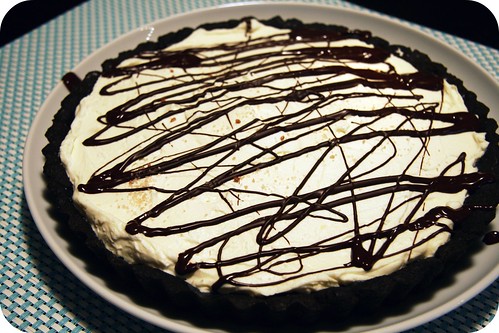
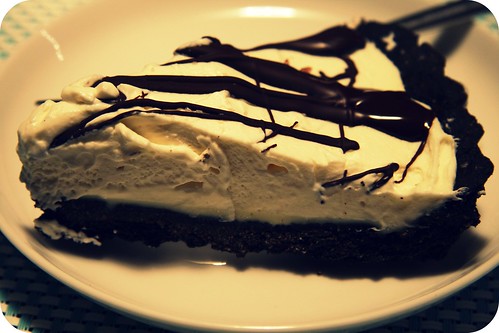
triple chocolate magic close upprofile oh yes

(Pretty, eh?)

6. Enjoy!!!

7. Oh yeah - please note - this is a 2-day process. Not a hard process though. Mostly inactive time. A lot of chilling. [Imagine a punny joke here.]

slice of white chocolate tart

Triple Chocolate Tart
Yield: one 9" tart, about 16 servings.
From yours truly, with a little help from Lottie & Doof and KAF

For the chocolate tart shell*:
8 tablespoons (1 stick) unsalted butter, room temperature
1/2 cup + 1 tablespoon powdered sugar
1 large egg yolk
1 teaspoon pure vanilla extract
1 1/4 cups whole wheat pastry flour, plus more for rolling (all-purpose would work too)
1/4 cup unsweetened cocoa powder**

For the white chocolate ganache/mousse filling:
1 3/4 cup + 2 tablespoons heavy whipping cream
9 ounces high quality white chocolate chips or chunks

For the salted-dark chocolate topping:
2 ounces bittersweet chocolate
Fleur-de-sel or other large, delicious flakey salt

Make the chocolate tart shell: In the bowl of an electric mixer fitted with the paddle attachment, cream butter and powdered sugar until combined, about 1 minute. Add egg yolk and vanilla, and beat until smooth. Sift in flour and cocoa powder, and beat on low speed until just combined. Scrape the dough onto a sheet of plastic wrap, and form it into a disk; wrap well. Chill until firm, at least 1 hour and up to 3 days.

Preheat oven to 325° F. On a lightly floured surface, roll the tart dough into a large circle 3/16 inch thick. Transfer the tart dough to a 10-inch fluted tart pan with a removable bottom and press into pan. If it falls apart at all just push it back together in the pan. Chill the tart shell in the refrigerator for 30 minutes.

Prick the shell all over with a fork. Line with parchment paper filled with pie weights or dried beans and blind bake for 15 minutes. Remove the parchment and weights, and bake until the pastry looks dry and set, 5 to 10 minutes. Transfer pan to a wire rack to cool. (The tart shell can be made 8 hours ahead.)

Now make the filling: Place the white chocolate in a bowl. In a saucepan over low heat, warm the cream until steaming. Add 1 cup hot cream to the white chocolate; stir until smooth. If all the white chocolate doesn't melt, heat mixture very briefly until all the chocolate is melted.

Drizzle 1/2 cup white chocolate mixture into cooled chocolate crust and spread with an offset spatula or the back of a spoon until there is a thin layer of white chocolate ganache covering the whole inside of the shell. Refrigerate shell again.

Gradually stir the rest of the heated cream into the remaining white chocolate/cream mixture. Stir until completely smooth, then cover and chill 8 hours, or overnight.

When you're ready to fill the tart, whip the chilled filling until stiff peaks form (FUN!). Spoon into the crust, and smooth the surface. Freeze, covered, until ready to serve.

Make the chocolate topping: Melt the chocolate in the microwave (use 30 second intervals and then stir until melted). Using a spoon, drizzle the chocolate attractively over white chocolate mousse. Sprinkle with fleur-de-sel. You can do this right before serving or ahead of time and store it in the freezer until it's time to serve.

And finally, to serve: Transfer the tart from the freezer to the refrigerator 30 minutes before you want to serve it, to soften. Slice and serve.
---------------------------------
*This chocolate cookie-like tart is not without its troubles. It all works out in the end but you might have to do a fair amount of patching as you roll the dough and form it into a tart shell. More on my first experience with it here.

**I used 2 tablespoons Dutch-process and 2 tablespoons of this crazy dark cocoa powder from King Arthur Flour called Black Cocoa which is CRAZY intense, almost bitter, and it contrasted with the sweetness of the white chocolate mousse filling bea-YOU-ti-fully.

Wednesday, February 8, 2012

When trial and error pay off: Spiced Coffeemaker Cubano

Despite being rather reliant on coffee since my first year of law school, which I started over seven years ago, and despite receiving a rather nice coffeemaker as a wedding shower gift even before the law school debacle started, I never knew how to brew hot coffee for myself until last fall. I'd mastered the art of cold brewed coffee (v. popular in Minnesota) and I broke my French press once trying to brew hot coffee. But this food-processing, Vita-mixing, dough-hook-loving, ice cream maker just couldn't face her fear of the common coffeemaker until she was really faced with no other options.

You see, last fall marked my first encounter with cold weather as a mother of two. And while I could justify a walk to the coffee shop with the children when it was nice out - they need their Vitamin D after all - and even a trip in the car when there was just the one baby - I couldn't put them or myself through that on a regular basis once jackets and boots for three were required. So I sucked it up and learned how to use my coffee maker. Who knew It's totally easy. And as much as I like supporting my local businesses, I like figuring out how much money I didn't spend since fall even more.

The best part - which brings us to this post - is that, after about four months of experimentation, I've finally mastered the perfect brew. Perfect for me, that is: a strong-brewed light roast just mildly, Cubano-style sweetened and with a teeny amount of cinnamon. Is it for everyone? Lord no, my mom would be horrified by this, especially with the amount of cream I add.


(I've been asked probably a million times if I'd like some coffee with my cream. "Yes please. Just a little. Good one!")

I'm betting someone out there will like this a lot however. So this is for you. Whoever you are.


It's brewed strong enough to hold its own over ice. So I drink half of it hot and then store the rest in a mason jar in the refrigerator until the next morning. I drink the saved portion over ice with a lot of milk or a little cream, depending on what we've got.

Spiced Coffeemaker Cubano
From me. Finally.
Yield: 5-6 cups

In the drip part of my 10-cup capacity coffeemaker, I place the following in a filter:

8 tablespoons finely ground Colombian coffee (that's half a cup, folks)
1/2 teaspoon cinnamon
1/2 teaspoon vanilla sugar (or brown sugar or regular sugar)

Then I put 5-6 cups filtered water in the water part. This is "8 cups" according to my coffee maker, because I think they consider a cup of coffee 6 ounces rather than 8 (or 12 or 16 or 20).

Then I turn the nob to "on." (Seriously. This was daunting to me for years?)

It's done in like three minutes, it's delicious, and it makes me a better mother. I'm not proud of that. But I am proud of how tasty this is.

Tuesday, February 7, 2012

From farm pantry to table: Canned Good Coconut Curry Soup (featuring pumpkin and tomatoes)

One of the classes I taught at Local D'Lish early on was called "Cooking Local Through Winter." It was a fun class to prepare for and to teach. Eating local food is super important to me. But as I tell my students: it's not easy to be a locavore in Minnesota. With few exceptions (hydroponics for one), nothing grows in Minnesota and our neighboring states from about November through April or May. (In contrast to California - where last year our jaws dropped at the amazing selection of fresh produce available at the Aptos farmer's market in January.) Moreover, much of the locally raised meat and locally produced dairy available in the Twin Cities is harder to find once our farmer's markets close up shop for the season.

Over the years my passion, commitment, and practice - both at the grocery store and in my kitchen - have made cooking and eating local foods easier; it comes more naturally to me all the time. It's so natural at this point that I often forget that my husband and I had to take a lot of baby steps to get where we are. Our seven years of CSA membership, our proximity to Local D'Lish and close relationship with its owners and staff, our connection to our co-op, and our easy access to several farmer's markets and farm-to-table restaurants in the community have all contributed to our knowledge about local foods as well as our ability to appreciate and utilize our region's food products in our own home.

Something I try to emphasize in my classes is that in order to eat local foods year-round in Minnesota, you have to shift your expectations about what your meals should look like. Come November, we have to ditch salad greens, fresh fruit, and herbs. This used to be really challenging for me. But several baby steps later, I don't have to eat asparagus or fresh peas in February. Being a locavore is kind of unglamorous in winter. After that first frost, the local produce that we can get our hands on will most likely be preserved: cellared root vegetables, canned tomatoes, frozen berries, dried beans. So long farmer's market, hello pantry.

coconut curry soup collage

So today's recipe is a bit of an homage to the pantry. Admittedly, this recipe isn't the best reflection of my locavore aspirations, what with coconut milk, mango chutney, and thai curry paste being key ingredients. (Last I checked they're not produced in the upper Midwest.) That said, I feel less guilty eating preserved foods from across the country (or world for that matter) than I do eating fresh fruit from another hemisphere. As I mentioned earlier, winter is tough. A token few exotic pantry items definitely make preserved tomatoes (canned by yours truly) and cellared or canned squash more enticing mid-season.

Reacquainting yourself with and embracing the practical benefits of preserved foods can be, ironically, refreshing. A well-stocked pantry comes in handy whether you're trying to eat locally or you just haven't made it to the grocery store in a while and you're low on perishables (my case when I threw this together). As this recipe demonstrates, if you've got a handful of versatile things in your pantry, you might end up with a simple soup good enough for company.

faux fresh

The best part: it takes all of 5 minutes active time to make - most of that spent using a can opener - and less than 30 start to finish. Every time I make a version of this I find it really gratifying. You probably will too.

Coconut Curry Soup with Tomatoes and Pumpkin
From my pantry, inspired by an old favorite 101 Cookbooks recipe
Yield: 4 servings

1 28-oz can tomatoes (or 2 lbs fresh tomatoes, coarsely chopped)
1 15-oz can coconut milk (I didn't even have that - used some dried coconut milk from KAF + some water; still tasted delicious)
1 lb cooked or 15-oz can pumpkin, winter squash, or sweet potato*
4 tablespoons (+/-) red curry paste
1 heaping tablespoon apricot or pineapple preserves, mango chutney, or honey (optional)
Salt and pepper to taste
Juice from 1-2 limes

Place tomatoes with juice, coconut milk, and squash or sweet potato in soup pot. If necessary, add water to just cover squash. Season with about 1/2 teaspoon salt. Heat over medium-high heat, bring to boil. Stir in red curry paste and preserves. Reduce heat to low and allow soup to simmer for 10-15 minutes, stirring occasionally. Remove from heat. Puree with an immersion or regular blender until smooth or mostly smooth or whatever. Taste and add salt and pepper. Finish with the lime juice right before serving.

*I have made this with roasted squash and found the sweet, distinct flavor that comes from roasting vegetables is sort of masked by the strong coconut-curry-ness of this soup. So, to keep this a simple, quick-cooking soup, if starting with fresh squash or sweet potatoes, I'd suggest steaming them or even cooking them in the microwave. No need to peel sweet potatoes. Never a need to peel sweet potatoes.

Wednesday, February 1, 2012

Kind of like crack, but for breakfast: Big Crunch Granola

Oh my HEAVENS. This stuff. This STUFF. I really can't overemphasize its addictive properties. But, you know, it's granola, which in the big scheme of things is probably one of the best things you could find yourself addicted to. Right? It's health food! Sort of. It's a combo of health (whole grains and seeds/nuts) and junk (sugar). As for the junk part, like Michael Pollan once told me and you and everyone who'd listen, as a rule (rule #39, to be specific), eat all the junk food you want as long as you cook it yourself. Homemade crack's okay! (Wait. Don't quote me on that. Hyperbole, folks. I dig it. Figurative = crack. Literal = trust me, you won't be able to stop indulging in this.) Pollan also recommends avoiding breakfast cereals that change the color of the milk (Rule #36). We're good on that front too. (For now.)

This granola is based on the formula and method provided in Melissa Clark's In the Kitchen with a Good Appetite. This is a FABULOUS cookbook. It accessible, quirky, funny, and - most importantly, as it is after all a cookbook - chock full of fantastic recipes. (The only doozie, in my opinion, is the recipe for toddler chicken tenders, but maybe I shouldn't have had such high hopes for toddler food.) I've made several of Clark's favorites as written and I've also taken substantial liberties with many of her recipes, all to great success - like Mark Bittman's, her recipes inspire creativity and beg to be messed about with. (Maybe it's a New York Times thing?) She's got a new cookbook out that I can't wait to get my hands on: Cook This Now. Someday I shall have it. For now though, it remains on my wishlist rather than my shelves.

This recipe is different from the previous granola recipe I posted (incidentally based on Mark Bittman's formula) and indeed from all other granola recipes I've seen, read, tasted. This one is special because, in writing it, Clark's utmost priority was to master the art of the big cluster. She succeeds. Her trick: maple syrup. Mine: brown rice syrup. She also uses olive oil but I went with the more neutral rice bran oil and it worked fine without imparting any noticeable flavor, which was what I wanted. I found the flavors of the toasty grains and seeds, the just-barely-molasses-aspects of the brown sugar and brown rice syrup, and the subtle spices combined with a heavy dose of salt were flavor enough. (Salty sweet! Totally aiding and abetting the crack factor.)

This recipe makes big crunch madness. No really. BIG. CRUNCH. MADNESS.

big crunch close up

It is perfectly, delectably, over-the-top salty-sweet breakfast love. The kind of love you can't get enough of. The good news is this recipe makes a substantial bunch and it lasts for a good week or two in an airtight container, so you don't have to restrain yourself too much.

pan of big crunch granola

And it just gets crunchier over time but not in an icky stale way. It's so wonderful! Addictively wonderful!

bowl of crunch

Big Crunch Granola
Yield: about 7-8 cups

Note: Because I was out of oats when I had a hankering to make this, I used random ingredients that I had on hand, mostly impulse purchases from King Arthur Flour ("KAF", yo). Purists might like Orangette's recent version. In her book, Clark uses oats, coconut flakes, pistachios, dried apricots, and a smidgen of ground cardamom. Another set of (more readily available) ingredients is suggested by The Leftoverist, one of my favorite food/life bloggers. Use whatever combination of grains, nuts and seeds you'd like (and are not allergic to) in an amount that totals 6 to 7 cups. I'm not a fan of dried fruit in my granola but, if you're of a different mind, toss in a cup of that once it's baked and cooled. Also, a good note from The Leftoverist to keep in mind if you make this, so that you don't freak out and abandon ship unnecessarily (because that would be tragic!): "As you're cooking this, it might look like you've done something wrong. The syrup will be bubbling up around the oats and it will look much more viscous than your regular granola might. Don't worry! Stir it every ten minutes, and let it cool all the way when it comes out of the oven. It will dry up nicely." The bubbling syrup is in fact what makes the big crunch. So it's to be embraced, not feared.

3 cups KAF malted wheat flakes
2 cups KAF Harvest Grains blend
1 cup unsweetened shredded coconut
1/2 cup sunflower seeds
1 1/2 teaspoon coarse salt
1 teaspoon cinnamon
1/3 cup brown sugar
1/2 cup rice bran oil
3/4 cup brown rice syrup

Preheat oven to 300 and line a baking sheet with parchment paper or a silpat.

Combine grains, seeds or nuts, coconut, or whatever, salt, cinnamon, and sugar in a large bowl. Drizzle in the oil and brown rice syrup and stir until everything is coated.

Spread mixture out evenly on baking sheet and bake for 35-45 minutes, stirring every ten minutes and removing when mixture is an even golden brown. Granola will be wet when you remove it from the oven, and will stick together quite a bit as it cools - think enormous oatmeal cookie... brittle. Once it's totally cool, break it up into chunks. You can, of course, break it up so it's quite loose, but where's the fun in that? Add a cup of dried fruit if you like and store in an airtight container for, theoretically, a few weeks. It won't last that long though.