Sunday, March 27, 2011

Thai Iced Tea

Have you ever had Thai iced tea? Or Malaysian iced tea? They are my favorite respective parts of my visits to Thai and Malaysian restaurants. The thing is, I don't often go to Thai and Malaysian restaurants. It's not that I don't like them. I do indeed. Um, hello, pad thai? Mango chicken? Delicious. BUT. They use a lot of tree nuts and sometimes I'm just not in the mood to grill servers on ingredient lists and/or ask for substitutions to stave off a hospital visit.

So what's a girl who loves Thai and Malaysian iced teas but only infrequently visits Thai and Malaysian restaurants to do? Why, search the interwebs of course! Sift through Food Network recipes! (There are several.) Embark on a little trial and error! Come up with the perfect homemade version of Thai iced tea to suit her own tastes and postpone experimentation with homemade versions of Malaysian iced tea for another time!

Sounds good! I'm on it. Excuse me.

---------------------------------------------

Okay. I'm back now. I am fast!

I've come up with what I like to think is pretty much the best Thai iced tea ever. You know, not being Thai and not having ever been to Thailand and only infrequently having patronized Thai restaurants (damn those pesky cashews!). But with the help of like every celebrity chef I've ever heard of and some I haven't heard of, and falling back on my resourcefulness to help me make certain decisions with respect to ingredients and proportions, I made some Thai iced tea that combines a bold, strong black tea flavor with a rich, creamy, silky-smooth mouth-feel (ew, I just said mouth-feel and I'm not wine tasting!) and an-almost-too-sweet-but-no-wait-a-minute-actually-quite-perfect-level-of sweetness.

primo ingredients
glass of thai iced tea

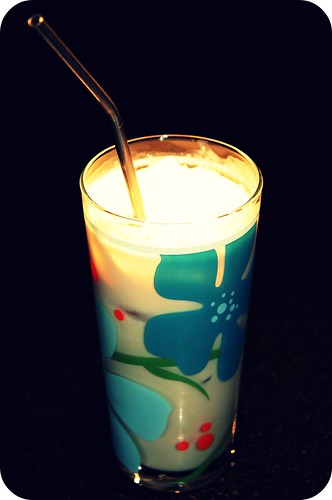
Better yet: it's super easy to make, requires only a handful of ingredients, and keeps well in a jar in the refrigerator for at least a week.

jarred iced tea

I think it's time I told you how to make it because your life will be better for having tasted this.

Thai Iced Tea
Not so much adapted from as influenced and inspired by a whole host of Food Network recipes (do a search if you want some other ideas)
Yield: 5-6 cups; about 6 servings

5 cups water
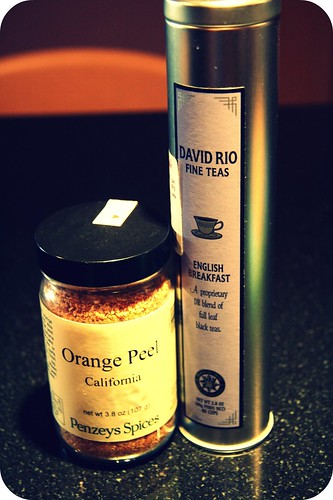
3 tablespoons loose leaf black tea (I used English breakfast)
2 tablespoons dried orange peel
1 whole star anise
1/2 cup (7 ounces) sweetened condensed milk
1/4 - 1/2 cup half-and-half or cream (optional)

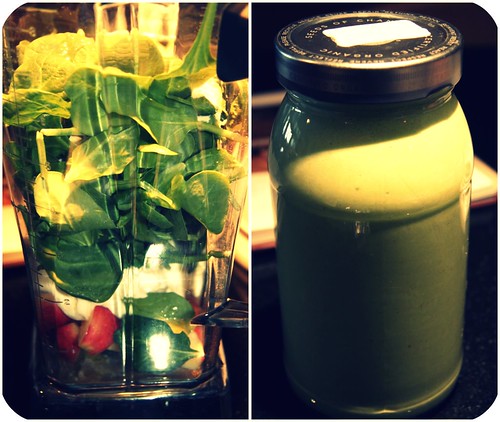
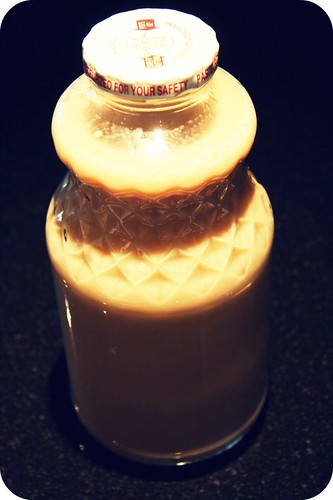
Bring water to boil. Stir in tea, orange peel, and star anise. Steep for 5-10 minutes and then strain using the finest-mesh strainer you have (ideally one meant for straining tea, or maybe even a coffee filter). While the tea is still warm, add the sweetened condensed milk and whisk until smooth. Allow the sweetened tea to cool a bit before transferring it to a refrigerator-proof container (I used two old juice jars, but a large pitcher that won't stain would work well too). Chill for at least a couple of hours.

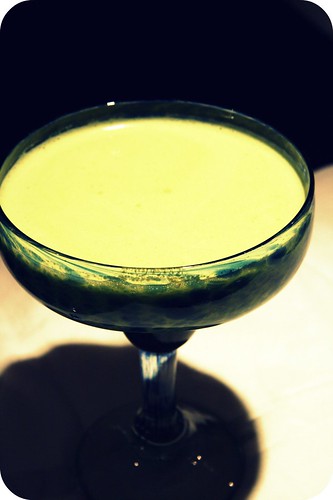
Once ready to drink it or serve it, you can either do so as is, over ice, or you can add the half-and-half or cream, in one of two ways: (1) stir in 1/4-1/2 cup of cream into the whole container of tea, or (2) add 1-2 tablespoons of cream to each serving, stirring well. I drank it without cream, with cream added in my cup and then finally with a bunch of cream mixed into what was left in the jar. It was all delicious, but my favorite was larger amount of cream mixed into the larger amount of tea, which made the beverage super creamy and homogenized and perfect.

Enjoy. With a friend. Or not.

Sunday, March 20, 2011

Chile Verde Stew

Hi. How are you? What are you doing? Is it exciting? I hope so.

I'm just waiting to have a baby and doing random things that make the time go by a little less uncomfortably. I take baths. I bake cookies. I bounce on a big blue exercise ball. I eat comfort food.

chile verde stew in pot

Tonight I made this delicious, v. aromatic stew for dinner. The smell reminded me of sancocho, a Colombian stew that my grandma and great-aunt used to make when I was young. The taste of the stew I made tonight though, while lovely, was not as much reminiscent of sancocho as of Santa Fe, where my husband and I randomly spent ten days a few years back. An odd place to randomly spend ten days, but we had a great time and ate a lot of green chile. In New Mexico I learned that I'm a green chile person more than a red chile person. If you are also a green chile person, you will like this chile verde stew. It is yummy and easy and it makes your kitchen smell like that of a Colombian grandmother. Maybe I'm summoning all that ancestral Colombian birthing energy to nourish and strengthen me in the next few days or weeks. Now bring on the buñuelos!

chile verde collage
bowl of stew

Keep in mind that this is a stew - which I will boldly define as a big pot full of things you'd like to use up from your freezer, pantry, and refrigerator, simmering with some spices and thickened broth. As such, it's open to myriad substitutions and modifications. Go to town.

Chile Verde Stew
Adapted from Epicurious
Yield: 4 servings

2 medium onions (about 1 pound total)
1-2 jalapeños, stems trimmed
5 garlic cloves
2 1/2 cups vegetable or chicken broth, divided
1 tablespoon olive oil or butter
1 pound ground beef or pork
1 medium to large sweet potato (8-10 ounces), cut into 1/2" dice*
1-2 teaspoons ground cumin
1-2 teaspoons ground coriander
1/2 teaspoon dried oregano
4 ounce can green chiles
2-3 cups cooked kidney or pinto or black beans, or hominy
1 cup chopped cilantro
Juice of half a lemon or lime
Bunch of green onions, finely chopped (optional)
Salt and pepper

Cut one onion into quarters and coarsely chop the other one. Purée the quartered onion, jalapeño(s) (seeds included), and garlic cloves with 1/2 cup chicken broth in a blender until smooth.

Heat 1 tablespoon oil in a soup pot or dutch oven over medium-high heat. Add beef or pork, sprinkle generously with salt and pepper, and cook, stirring and breaking up clumps with a spatula just until no longer pink, about 4-6 minutes. Transfer meat to a bowl with a slotted spoon. Reserve the fat in the pan.

Keeping heat at medium-high, add chopped onion and sweet potato to the drippings and cook, stirring occasionally, until onions are translucent, about 5 minutes. Add the chile verde purée, cumin, coriander, and oregano, and stir well for about a minute. Lower heat a bit and cook, stirring every couple minutes, until mixture is thickened and most of liquid is evaporated, about 10 minutes.

Return the meat to the pan, along with the beans or hominy, canned green chiles, remaining 1 1/2 cups broth, and chopped cilantro. Bring to simmer, uncovered, and stir occasionally for about ten minutes.

Turn off stove, stir in lemon or lime juice, taste to see if more salt or pepper is needed, and stir in green onions, if using. Serve in large bowls with rice, corn bread, tortillas, tortilla chips, or what we happened to have on hand: some homemade whole grain bread.

It really hit the spot tonight. I bet it will be even better tomorrow. (I'll let you know.)

*Winter squash, a couple regular potatoes, or a large, firm plantain would all be great substitutions for the sweet potato.

Thursday, March 17, 2011

Smoky, Salty (and just a tad Spicy) Chocolate Chip Cookies

Does the world need another chocolate chip cookie recipe? I don't know. There are some pretty good ones out there. Rare is the person who can resist the good old-fashioned tried and true Tollhouse recipe that we were all raised with. I've heard (but not personally confirmed) that the America's Test Kitchen chocolate chip cookie recipe is comparably ab-fab. David Leite's recipe - despite being daunting, time consuming, and requiring a long list of expensive ingredients - took the internet by storm a few years back deservedly so, as it seriously produces the most seriously amazing chocolate chip cookies ever, particularly if you get your hands on some seriously amazing minimum 60% cacao bittersweet chocolate fèves or disks. (I did.) More recently, Kim Boyce's whole wheat version has been gushed about and just barely adapted on Food in Jars, Orangette, and 101 Cookbooks. (I actually have and love Good to the Grain and was v. pleased with the four things I've made from it so far (namely, quinoa porridge, kamut sand cookies, pear-buckwheat pancakes, and oatmeal sandwich bread), but haven't gotten around to trying the actual chocolate chip cookie recipe yet.)

So what are we doing here? Do I fancy myself so fancy a baker that I can really add something fancy and special to what's already out there?

close up

Well, evidently, yes. But not alone or uninfluenced. I created the smoky, salty, and just a tad spicy recipe below after being inspired by the Homesick Texan's recipe for Chocolate Chip-Pecan Cookies, in which she uses bacon grease. I'm sure her recipe is fine and good on its own, but I've never been one to leave well enough alone, and I felt like I wanted to experiment a bit if I was using bacon fat in my cookie batter: by adjusting the flour/sugar quantities, I went for a crispier, crumbier cookie than the kind that you can already get by using butter and following any of the recipes mentioned above or countless others. And I wanted to highlight the smokiness and saltiness that bacon grease had the potential to provide a cookie. Finally, I pretty much never use strictly all-purpose flour unless I am making an America's Test Kitchen recipe and want it to end up as perfect and unencumbered by my frequently-taken liberties as a recipe developed by America's Test Kitchen is most certain to be.

(Oh. And I omitted pecans because I'm allergic to them.)

both batches

Anyway, before I share the recipe, note (as pictured above) that I made two batches: one baked at 350 degrees for about 20 minutes (left), and one convection baked at 350 degrees for about 15 (right); both times I turned the baking sheet 180 degrees after 8 minutes. The first batch ended up delicious, but right out of the oven they appeared softer than I thought they should be, hence convection bake the second time around. Ultimately, both batches ended up semi-crunchy/semi-soft once they'd cooled, although the second batch was slightly crunchier and I quite liked that, so I've gone ahead and included just the regular baking instructions in the recipe. Keep an eye on them and bake them as long as you'd like. But trust me when I say - and mind you, I like a gooey cookie most of the time - a little browning and a little crunch really add to the whole smoky, salty, spicy thing in making this a unique and lovely cookie.

wet mix
ancho and dry mix
in and out of oven

Smoky, Salty (and just a tad Spicy) Chocolate Chip Cookies
Inspired by Homesick Texan
Yield: 3 dozen cookies

1 cup brown sugar
1/2 cup butter
1/2 cup bacon grease (or margarine or more butter)
1 egg
2 tablespoons milk*
2 tablespoons plain or vanilla yogurt*
1 tablespoon vanilla
1 cup all purpose flour
1 1/2 cups spelt flour (or more all purpose flour or whole wheat flour)
1 teaspoon baking powder
1/2 teaspoon baking soda
1/2 teaspoon salt
1 teaspoon cinnamon (or more)
1/2 - 1 teaspoon ancho chili powder (or a lesser amount of cayenne or chipotle chili powder)
2 cups milk chocolate chips
Fleur de sel or other flaky salt, to finish

Preheat oven to 350 degrees. Line a baking sheet with parchment paper or a Silpat, or grease liberally with butter.

Using an electric mixer, cream brown sugar, butter and bacon grease. When fluffy, add egg, followed by milk, yogurt, and vanilla, and mix until smooth. Whisk together the flours, baking powder, baking soda, salt, cinnamon, and chili powder in a separate bowl. Add to wet ingredients and stir in until fully incorporated. Add the milk chocolate chips.

Scoop up heaping tablespoonfuls of dough and place on your prepared baking sheet, with at least two inches between each cookie (see in picture above how much they'll spread). Sprinkle each mound of cookie dough with a pinch of fleur de sel or other large-grained salt. Bake for 18-22 minutes, rotating baking sheet 180 degrees after about 10 minutes, for even browning. Once they're as brown as you want them, remove the cookies immediately from baking sheets and allow to cool on racks. Repeat with remaining dough.

I found these cookies - oddly enough - were best when completely cooled. The smokiness of the ancho and bacon grease plus the super sweetness of the milk chocolate chips were most obvious and enjoyable at that point. But, obviously, a warm, melty cookie is never a bad thing, so if you can't wait, you can't wait.

Both the cookies and the dough freeze well. Allow dough to thaw in the refrigerator over night before trying to scoop out the batter and add a minute to your baking time.

*1/4 cup buttermilk can be used for milk + yogurt combo, if you have it on hand

Sunday, March 13, 2011

Slow-and-Red-Cooked Rump Roast

Happy 100th post! I love food! (And so can you!)

I can't wait to see what kind of google search terms lead to this post. "Slow and red" seems like it could be open to a great deal of interpretation. And "rump" just makes me laugh a little. In this case, "slow" refers to the use of your trusty slow cooker, and "red" refers to a Chinese method of poaching or braising meat in a salty-sweet liquid with a bunch of delicious spices, the combination of which makes a beautiful flavorful reusable sauce. "Rump" refers to the particular cut of meat that I used when I made this meal: a big, juicy cut from "the fleshy hindquarters" of the animal.

Red Roast Collage

This recipe is fantastic and easy. It involves using up most of that bottle of soy sauce in your pantry and it may require a trip to the grocery store if you don't happen to have star anise already in your spice drawer. (But you'll probably want to go to the store to get the freshest, best-looking rump roast you can find anyway.)

star anise close-up

Whole star anise is featured in the picture above, the delicate, flower-shaped item. Pretty, eh? I have never had a problem finding it in the regular spice section of a regular grocery store, but if you can't find it there, they sell it in bulk at co-ops (which means it will cost you like 10 cents if you just buy the two you need), and the cookbook from whence this recipe arrived suggests trying the Asian or Latin American foods sections of large grocery stores, or an Asian or Latin American market.

This recipe does everything to a big, juicy cut of meat that you want your slow cooker to do, AND THEN SOME. At first, when you see all the marbling (in addition to the 1" thick coating of fat) that a big, juicy rump roast has to offer, you're a little stunned and afraid. Will this give me a heart attack? you might wonder. (Probably not, but you can do your own research on that.) After slow-cooking the roast, however, the marbling produces the juiciest, tenderest roast you've ever tasted, and the thick coating can be scraped off easily with a fork (and given to your toddler, who needs it and loves it).

done!

This is the kind of slow-cooked roast that literally melts in your mouth.

perfect bite

I miss it so much.

Also: I wasn't kidding about reusable. At the end of the recipe there are instructions for how to strain, store, replenish, and reuse the sauce as many times as you'd like/feel comfortable doing.

Slow-and-Red-Cooked Rump Roast

Adapted only ever-so-slightly from Not Your Mother's Slow Cooker Cookbook (which doesn't have any pictures and might be a good cookbook to buy for your Kindle - something I'm aching to do but keep running into road blocks)
Yield: 6 servings

1 1/2 cups water
1 cup soy sauce
1/4 cup mirin (or any kind of rice wine or dry sherry or rice vinegar)
2 tablespoons honey (or sugar or something else sweet)
2 green onions, white and green parts, roughly chopped
1 tablespoon minced fresh ginger
2 cloves garlic, minced or pressed
2 whole star anises
1 stick cinnamon
1 strip orange zest, about 3" long
3-4 pound rump roast, blotted dry

Pour all the ingredients (except for the roast) into the slow cooker. Whisk together a bit, cover, and cook on HIGH for 30 minutes to an hour.

Put the roast in the slow cooker and carefully turn to coat both sides with liquid (you could just spoon or baste the liquid over the top and sides). Cover, turn the heat to LOW, and cook for 4 hours. Carefully turn over the roast, cover, and continue to cook on LOW for 3-4 hours more.

When ready to eat, remove the roast from the cooking liquid and place on a cutting board or serving plate. Allow to rest for about 10 minutes, then either carve into thin slices or shred with two forks. Drizzle with a few spoonfuls of the cooking liquid and serve. (Good with plain rice or alongside a Sweet Potato-Quinoa salad.)

To reserve and reuse the cooking liquid: Allow the remaining cooking liquid to cool a bit and then pour it through a strainer into a heavy glass jar (we use a Mason jar). Discard solids. Allow to cool completely, cover the jar, and refrigerate for 7-10 days, or freeze for up to 3 months. To reuse the red-cooking liquid, thaw if frozen, remove and discard the fat that has solidified on top, and pour the liquid into the slow cooker pot, proceeding with above recipe with fresh meat, OR making roast chicken (see below). So far the most we've used it is two times after the initial braising. We've never stored it in the freezer. I'm sure more than two times would be fine and freezing would be fine, but we don't eat meat that often and our freezer is tiny. The original recipe suggests that after every third or fourth use, you can "refresh the liquid by adding 1/2 cup soy sauce and half the seasonings". (To me, starting over seems just as well.)

To make roast chicken: You'll need a 3-4 pound whole chicken (broiler/fryer), giblets discarded. Rinse and dry the chicken well. Either stir all the ingredients together if you are starting from scratch, or pour the stored cooking liquid into the slow cooker. (You'll want about 3 cups of fluid, so add a little soy sauce and/or a little water to make up for any deficit.) Add the chicken to the red-cooking liquid in the slow cooker and turn it to coat. Leave it breast side up, cover, and cook on HIGH for 1 hour. Carefully (seriously - this is harder than is sounds like it should be, use both hands, one with large tongs and the other with a large fork inserted in the cavity) turn the chicken over, breast side down. Cover and cook on HIGH for 1-2 hours more, until an instant-read thermometer inserted into the thickest part of the thigh registers 180 degrees. Remove chicken from cooker. Either allow the chicken to cool for 10 minutes and then carve to serve immediately, drizzled with some sauce; or, to serve it cold (what we do), refrigerate the chicken, uncovered, before cutting or shredding it as you'd like. Follow above instructions to reserve sauce again.

Thursday, March 10, 2011

Peanut Butter Banana Muffins with Mini Peanut Butter Cups

Oh man. These are as good as they sound. The mini peanut butter cups are from Trader Joe's, where I went last Friday, to get a bouquet of flowers for my super star actress friend whose show I was on my way to see, and ended up buying a whole slew of random confections because (a) Trader Joe's is dangerously cheap; and (b) I'm a sucker for packaging. A week later: these are not impulse purchases I've regretted. These are impulse purchases that have filled our home with joy.

pb muffins in pan
peanut butter muffin

You should totally make these. Elvis would want you to.

Peanut Butter Banana Muffins with Mini Peanut Butter Cups
Adapted from Joy the Baker
Yield: 12 muffins

1.5-2 cups mashed, super ripe bananas (about 3-4)
1/3 cup plain yogurt or sour cream
1/3 cup peanut butter (I used natural creamy unsweetened kind)
3 tablespoons butter or margarine, melted, or mild-flavored oil
2 eggs
1 teaspoon vanilla
2/3 cup brown sugar
1/4 cup ground flaxseed (flax meal)
1 1/2 cups flour (I used spelt flour, but any combination of whole wheat pastry or all-purpose flours would work)
1 teaspoon baking soda
3/4 teaspoon salt
1 cup mini peanut butter cups, or chopped regular peanut butter cups, or milk chocolate chips

Grease a muffin tin and preheat oven to 350 degrees. (Or 325 degrees if you want to use convection bake option on your oven. Check them at 15 minutes if you do this; mine were done at about 16 minutes.)

Using a wooden spoon or whisk, stir together bananas, yogurt or sour cream, peanut butter, and butter or margarine. Add eggs and stir until well-incorporated. Add the brown sugar and vanilla and stir well.

In a separate bowl, whisk together the ground flaxseed, flour, baking soda and salt. (Or, if you don't like to dirty more bowls than is absolutely necessary, you can just put all these ingredients directly into your wet mix, sprinkling them a bit to ensure even distribution without over-mixing.) Add the dry to the wet and stir just until no flour chunks remain. Gently stir in the mini peanut butter cups.

Using a 1/3 or 1/2-cup measuring cup to scoop up the batter, fill 12 muffin cups evenly. Bake for 15-20 minutes, rotating 180 degrees after about 8 minutes so that they brown evenly. Good warm but even better and more peanut buttery when they've cooled completely. They also freeze well. Just microwave them enough to thaw: 30-45 seconds seems to do the job.

Nutritional info per one muffin:
275 calories / 35 g carbohydrates / 7 g protein
------------------------------
P.S. added on 3/11/10
In addition to using spelt flour rather than regular or whole wheat pastry flour and making muffins rather than a loaf, I adapted Joy the Baker's recipe by reducing the amount of sugar by a third (a cup seemed like a lot, and I once read that a certain pastry chef always reduced the sugar called for in a recipe by either a quarter or third because she felt desserts were often too sweet, which I tend to agree with, unless the dessert is fudge or candy or something that is clearly intended to be nothing other than sickeningly sweet), increasing the amounts of baking soda and salt slightly (I like a puffy, salty muffin and felt that spelt flour, a bit denser than all-purpose flour and pastry flour, would require a tad more leavening), omitting spices (I wanted the peanut butter flavor to be decidedly dominant, with no cinnamon- or clove-induced distractions), adding vanilla, and, of course, replacing 1/4 cup crushed peanuts with a whole whopping cup of mini peanut butter cups. Just listing the changes I made in case you were not sure which recipe to try and wanted a description of their differences to better inform your decision.

Monday, March 7, 2011

Creamy Green Protein Machine Smoothie

Happy Foodblogiversary to me! I know. Can you believe it's been a year? It has. And it's been so fun. And I've eaten a lot. And I think my photography and photo-editing skills have improved. And I've spent more money on butter and spices and various flour products than ever before. And thanks for playing, folks.

I thought it would be really fitting to post about cake today. You know, because of the whole "Have Your Cake and Edith Too" thing. Plus there's sort of been a cake deficit lately (partly because of GD). A cake post would have given today a lovely sense of occasion.

But.

I didn't really photographically document the last cake I made, and while it was really wonderful I have a few ideas to step it up a notch or two more, so I am going to wait to post about that one. Making a cake this weekend or tonight was the only alternative and, well, the weekend sort of flew by and I don't feel comfortable waiting until tonight to post on my 1st Foodblogiversary.

So no cake. Sorry.

No hundredth post. Sorry.

Instead, for my ninety-eighth post, in honor of my first foodblogiversary, I am posting a recipe for a super creamy green protein machine smoothie. It's something we've had frequently in our house lately. It's really delicious. It balances carbohydrates and protein in a way that we should all try to do all the time (at least if we're diabetic). And I kind of feel like it is v. prototypical Edith - v. much like what we eat in our home on a daily basis, if not necessarily like the more decadent things I post about here - earthy, random, nutritious, weighed, blended, involving ingredients that one might not necessarily have in the average pantry but that are certainly worth trying out.

before and after smoothie

It also looks v. good in a margarita glass. If, say, for instance, your margarita glasses have gotten a little dusty and out of shape sitting in the cupboard all lonely and pretty and blue while you've been growing a human being in your uterus and abstaining (mostly) from alcohol during that epic process.

smoothie margarita style

Creamy Green Protein Machine Smoothie
From yours truly
Yield: 3 servings

2-3 pitted dates (or 1/4 cup date syrup*)
50 grams baby spinach (two big handfuls)
1 small apple, cored and cut into chunks (banana or pear or mango would be good substitutes)
1/2 cup plain Greek or regular yogurt
1 tablespoon flaxseed oil
1 scoop vanilla-flavored protein powder**
1/2 cup ice
1-2 cups water

Blend everything until as smooth as possible. Serve immediately or store in a jar in the refrigerator for up to 2-3 days, shaking well before serving.

* Date syrup recipe: Blend 10 medjool dates or 20 regular dates (pitted) with 1-3/4 cups water and 1 tablespoon lemon juice until smooth. Use in smoothies, mixed with yogurt, or as a topping on pancakes or waffles or oatmeal.

** If you use a protein powder that is not sweetened, I'd be sure to use the full 3 dates OR 1/4 cup date syrup + 1 tablespoon honey or maple syrup or agave nectar OR add some stevia or other sweetener with which you have experience.

If you use traditionally made Greek yogurt, the Tera's Whey protein, and dates instead of date syrup, the nutritional information will look something like this per serving:
216 calories / 37 g carbohydrates / 8 g protein

Thank you again for reading and experimenting with me! Here's to another year!

Thursday, March 3, 2011

Sweet Potato, Quinoa and Swiss Chard Salad

When you read a lot of food blogs, you notice certain trends and you find yourself interested in certain cookbooks and chefs and writers that are raved about on one or several of your favorite blogs. For example, before Christmas, I found myself inevitably, somewhat blindly enamored with a British chef/writer named Yotam Ottolenghi, who's been discussed at Lottie + Doof, 101 Cookbooks, and Smitten Kitchen (to name just the first few that come to mind). He owns several restaurants in London, writes a weekly column in The Guardian, and has published two cookbooks: Ottolenghi: The Cookbook, published last year, and now Plenty, scheduled for release in the states on March 23rd. (Maybe a good birthday present for someone whose birthday happens to be that day? Just made a mental note.) Around Christmas time (during which we celebrate the coming of Baby Jesus and update our amazon.com wish lists), I couldn't wait until March, and also there was no indication of an American release at that time, so I got the British version of the book for my birthday from my terribly, wonderfully generous in-laws. (Which edition would've been better to own in the long run is a toss up: I have to do a lot of weighing and converting if I want to precisely follow the recipes in the British version. On the other hand, I prefer its way funkier cover (and don't often follow recipes v. precisely).)

Anyway. What started out as blind - it was rather everybody-else-is-doing-it of me, augmented by an endless personal fascination with all-things-British - has turned into an informed, v. justifiable love of this man and his creative exploits in the kitchen. What's more: as soon as spring becomes a reality here in the midwest and I am tripping over all the CSA vegetables that end up taking over my home for six months of the year, I am going to love this book even more. The recipes are all vegetarian (though Ottolenghi himself is not vegetarian), and the cookbook offers a stunning array of ways to creatively use whole grains, legumes, vegetables, good quality dairy, and loads of obscure, exotic spices. It is a truly inspiring volume. Amazing photography. Useful recipe notes. It's organized by veggie, which I find cool. Its presence in our home has resulted in trips to the spice store and Middle Eastern grocery, has enhanced both the nutritiousness and deliciousness of our meatless meals, and has really cut into my parenting book and novel reading. Yep. Need some good bedtime reading? Plenty, it is.

I speak in extremes and use a lot of superlatives. I know it. But for whatever it's worth: Plenty is my new favorite cookbook. (It might be yours too someday.)

salad ready to be tossed

The first thing I have to share from my new favorite cookbook is adapted quite a bit, not because I didn't have every intention of following the recipe to a T, but because I made some errors along the way regarding measurements and cook times. It's meant to be a wild rice recipe, and I had bought the wild rice blend that it called for but then read on the packaging that it takes almost an hour to cook. I didn't realize that and we were hungry. I was also nervous about using too much of the ground Iranian dried lime, as it smells v. potent and foreign. So anyway. Shortcuts were taken. Substitutions were made. Spices were adjusted. It turned out absolutely wonderful nonetheless.

sweet potatoes and quinoa
mise en place
tossed ottolenghi salad

Sweet Potato, Quinoa and Swiss Chard Salad
Adapted from Yotam Ottolenghi
Yield: 4 servings

Notes: Have all your fresh herbs, greens, garlic and onions ready to go before you start anything else. (Or right after you put sweet potatoes in the oven.)

1 lb sweet potato (1 large or 2 small-medium)
1/4 cup olive oil
1 cup uncooked quinoa
2 garlic cloves, thinly sliced
2 large leaves swiss chard, sliced into thin ribbons (about 1-2 cups)
1 tablespoon chopped sage leaves
1 tablespoon chopped oregano
2 teaspoons dried Iranian lime*
3 tablespoons shredded spearmint
2 green onions, thinly sliced
Juice of one lemon
2 ounces feta
salt and freshly ground black pepper

Preheat oven to 350 degrees. Scrub the sweet potatoes a bit and cut them into about an inch dice. Spread on a baking sheet, toss with 2 tablespoons of olive oil, and sprinkle with about 1/4 teaspoon coarse salt and 1/4 teaspoon pepper. Roast for 20-25 minutes, until tender.

Meanwhile, cook the quinoa according to package instructions. (Or: place the quinoa in a pan with two cups of water; simmer for 9-10 minutes, until all the water has been absorbed; fluff with a fork.) When done, transfer the quinoa to a large serving bowl.

Pour the remaining 2 tablespoons of olive oil into a small frying pan. Fry the garlic and swiss chard for about a minute. Add the sage and oregano and stir as your fry for about a minute more. Pour the contents of the pan, scraping out as much oil as possible, over the quinoa.

Next, add the roast sweet potato with its oil. Add the lime powder, spearmint, green onions, and lemon juice. Crumble the feta on top and finish with some salt and pepper. Toss everything v. gently. Taste and adjust the seasoning. Serve at room temperature.

I reheated the leftovers the next day in the microwave for about thirty seconds (just to take refrigerator chill out), drizzled a little more olive oil on top, and it was even better. The flavors married beautifully and the cheese got just a little melty. Delicious.

* I realize you might not be as keen on finding obscure, exotic spices at Middle Eastern grocers as I am - regardless of how insanely cheap they are once you find them (like two bucks!). Dried Iranian limes are available in big bags, whole, and kind of look like large walnuts. While Ottolenghi says that grinding whole limes yourself makes for a more flavorful powder, and is thus ideal, I just bought a ground version (the person I talked to at the store assured me it was the same thing) and it was quite flavorful: slightly fruity, with a tad of sourness, and then a little earthy as well. Some alternatives that I think would work (but I haven't tried) are: finely minced fresh lemongrass or kaffir lime leaves; amchur powder (use a little less though, as it is stronger than the Iranian limes); zest of an orange or lime or grapefruit, as finely grated/minced as possible; or as a last resort, some more lemon juice.

Tuesday, March 1, 2011

Roasted Winter Squash Soup with Pear and Fennel

A little over a week ago, I was like, if I just post six more times before March 7, I'll have posted 100 times in the last year. (Yep. My foodblogiversary is just around the corner.) I thought 100 posts in 365 days - despite how randomly said posts were distributed throughout said days - sounded like a v. respectable frequency indeed. So I posted! But then some more days passed. And I didn't post. And now March 7 is really soon. Like so soon that I'd have to blog every day until March 7 to actually achieve the respectable frequency of posts for which I was aiming. And this stresses me out so much that I'm using proper English grammar in a terribly awkward way.

Fortunately, I'm at a point in my life where accomplishing goals is more like a trip to the casino than something that actually dictates how I spend my days: if I'm successful, that's awesome; if I'm not, it was fun dreaming, better luck next time, maybe a little loss of pride but where has pride ever gotten me in life anyway?

Wait a minute. What did you say? There's a loss of money involved when you don't win at the casino? Yikes. Well. Next time I'll base my analogies on things I've actually experienced.

evolving squash

Speaking of things I've experienced: let's talk about the most unique and delicious winter squash soup recipe I've come across so far. (And I make winter squash soup fairly often.) I'm almost embarrassed to admit where this recipe came from. Not because it's a source that I'm anything other than blessed, honored, and delighted to own - the source being Dorie Greenspan's wonderful, beautiful, inspiring Around My French Table - but because it's the second time I've referenced this lovely cookbook, and both times have been about soup. So why am I only almost embarrassed about the two soups? Because I live in Minnesota. It's cold here. We eat soup. It's not that embarrassing.

What makes this soup so special and stunning? (What makes you ask so many rhetorical questions?) Not cream, not butter, not a heavy dose of cleverly-blended spices. No indeed. What makes this soup so stunning are the following: 1 fennel bulb + 2 juicy pears.

halved squash
fruity ingredients

Also, the squash is roasted, and that always ups the sweetness of a soup.

And there are citrusy undertones incorporated.

And everything about this soup is, in a word, divine.

bowl of squash soup

It doesn't even need that drizzle of cream at the end. But I really like cream.

Before we get to the recipe: if I do end up hitting 100 posts by next Monday, congratulations to US! I begged for comments last time because I missed them. But I'm always grateful for the off-the-record affirmations and words of encouragement I receive from those of you who read this blog. I couldn't do it without you. Thank you thank you thank you.

And now, soup!

Pear, Fennel, and Roasted Winter Squash Soup
Yield: 6 delicious main-course servings

3-ish pounds of winter squash, halved and seeded (I used one butternut and one acorn)
2 tablespoons olive oil
1 yellow onion, coarsely chopped
1 medium fennel bulb, trimmed, core removed, coarsely chopped
1 clove garlic, thinly sliced
1 1/2 teaspoons ground ginger
1 teaspoon ground cumin
1/4 teaspoon freshly ground nutmeg
Salt and pepper
5-6 cups vegetable broth
2 ripe pears, cored and coarsely chopped
2 strips of orange peel (each about 2-3" in length)
Juice of 1-2 lemons
Cream, for garnish

Preheat oven to 425 degrees. Line a baking sheet with foil. Place squash halves, skin-side down, on lined baking sheet. Rub a little bit of oil on the flesh of the squash and sprinkle with a little salt. Place baking sheet in oven and roast for about an hour. To check for doneness (after about 45 minutes or so), use a knife: when you can pierce the flesh easily with the tip of the knife, it's ready to come out of the oven. Once the squash is cool enough to handle, remove the peel (it should come off easily just using your fingers) and coarsely chop the squash into about 2-inch chunks.

Heat two tablespoons of olive oil in a large pot over low heat. Stir in the onions. Season lightly with salt and cook until onions are soft but not browning. Add the fennel, garlic, and a little more salt. Cook, stirring often, until all the vegetables are soft, about 5-7 minutes. Stir in the squash, all the spices, 1/4 teaspoon salt, and a few grinds of pepper. Pour in 5 cups of broth, increase the heat and bring to a boil, then reduce heat so soup simmers gently. Add the pears and orange peel. Partially cover the pot and simmer for about 20 minutes. Puree the soup using an immersion blender or a regular blender, in batches. Taste and add more salt and pepper if you'd like. Stir in more broth if you'd like a thinner soup and warm on stove until heated through. Just before you're ready to serve the soup, stir in the lemon juice.

Garnish with cream or anything else you come up with.