
Do you like "Ten Posts" rather than "Ten Days"? I just don't want to set myself up for failure and you for disappointment. The best I can do is this: plan to get them all posted during the month of November. Which means ten posts in just over twice as many days. Which is better than my usual. Which I think you'll really enjoy. Maybe almost as much as some of you (I won't name any names) enjoyed your recent batch of scones. (No judgment here, dude. I am first and foremost complimented. I am secondmost jealous. I want a scone. Or six. And I want to try them with berries! Maybe in December...)
Also, I like alliteration.
Okay. So, let's get down to business, folks. First things first: how to make your pumpkin edible. As a side note, I'd like to say that I wasn't planning on eating my pumpkin for a while. She was such a handsome pumpkin.

I didn't even do my usual photo-editing on her. Her color required no enhancement. She was perfect, and I feel that, sitting outside my door alongside a smaller pumpkin, she made my home a little more inviting than my boring grey-and-black door mat usually does, and I was prepared to allow her to continue doing just that through November.
And then we had our homeowner's association annual meeting.
And our property manager walked by my door.
And I was informed that I could not have my pumpkins outside the door, no matter how pretty they were, because they were "live" (by which I think she probably, more accurately, meant "real"). And, you know, they could rot and damage the hallway carpet. Or, worse yet, someone could be in the hallway - drunk! - and could kick the pumpkin and make a mess and - oh dear! - that would be just absolutely catastrophic.
So my pumpkins came inside and I was just about to roll my eyes at the whole thing when I noticed that, what do you know, my littler pumpkin was in fact molding in a place I couldn't see. There was no carpet damage though. And the big pumpkin was perfectly lovely still, so I, ever-so-humbled, roasted her and made some pumpkin "purée" which really isn't puréed at all, at least not the way I did it.
And now I am here to help you salvage your own pumpkin for the purpose of making baked goods, fancy fall hot beverages, and, I don't know, if we're lucky, maybe even pumpkin mac & cheese. It's really easy and less time-consuming than you'd expect, and you only need these tools: roasting pan (either one large or 2 small), really great knife, and ice cream scoop. If you have a grapefruit spoon, that is helpful but by no means necessary.
Okay. So, I'll just tell you what to do step by step.
Step 1: Cut pumpkin in half, using a super sharp knife. I read somewhere that it works to use a serrated knife like a saw. I tried that and learned that it would work to cut my hand in half, but not necessarily to cut my pumpkin in half. I ended up using my giant, recently sharpened chef's knife like an axe and that was great. Oh, and preheat oven to 350 degrees.

Step 2: Remove the seeds, using a fork or spoon or ice cream scoop or grapefruit spoon. This is the hardest part in my opinion. Try to get as much of the stringy fibers out as possible, but don't worry about having some left over. It will kind of burn in the oven and then you can pull it off with your fingers once the pumpkin has been roasted. (If you'd like, save the seeds by putting them in a large bowl of water for now.)
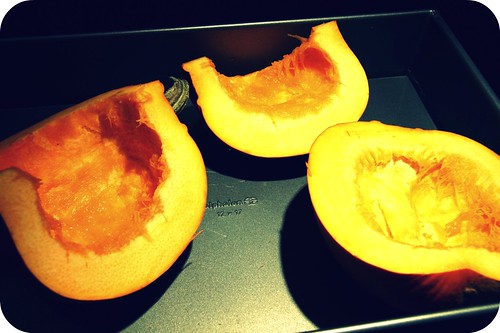
Step 3: Place the pumpkins, skin side down, in a large roasting pan. (I had to cut my pumpkin into three pieces in order to get it to fit. This is fine - better even, maybe, because then it cooks faster.) Add a cup or two of water to the pan so that it's about half an inch deep, or slightly less. Place the pan in the preheated oven (it's okay if it's not all the way hot yet) and roast for 45 minutes. I used the "convection roast" setting on my oven and was v. pleased with the results. If you have it, go for it.
(Meanwhile, you can scrub clean the seeds if you've saved them. Drain them in a colander and place them to dry on a clean towel, in one layer. You could also use paper towels but I think that's totally wasteful so if you do, don't tell me. I'll tell you what to do with them once dry in a later post.)
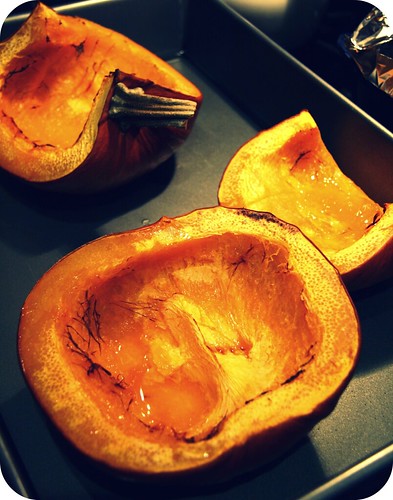
After 45 minutes, using a fork, check the pumpkin to see if it is malleable/scoopable. It will be v. soft and look like this when done:
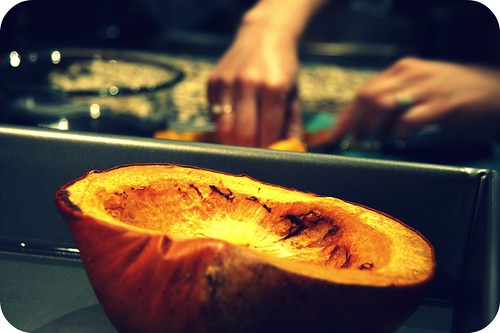
Step 4: Using tongs or your hands, covered with towels or something so as not to melt the skin off your fingers, remove the pumpkin halves/pieces from the roasting pan and allow them to dry and cool on a towel or plate. Mine had some condensation in the centers, which poured off quite easily.
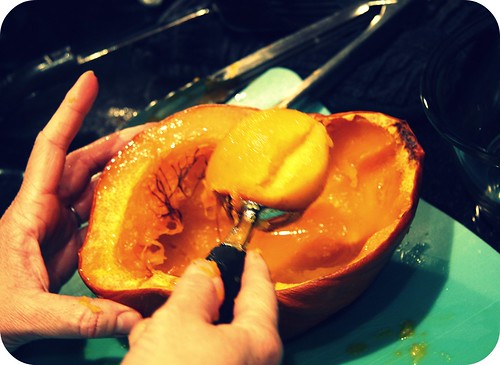
Step 5: Have a large container ready that you'd like to use to store your pumpkin. Using an ice cream scoop, carefully (the pumpkins are quite floppy at this point) scoop out the flesh from the pumpkin skins. This is the easiest and most fun part. You will have only the thinnest of skin remaining - like the peel of an apple or pear, but a bit firmer. Pour the pumpkin flesh into your container, ready to store.

My pumpkin was pretty big, and I ended up with about 6 cups of pumpkin flesh. You can store it in your refrigerator for about a week, or in your freezer for a while longer. I used mine all up before needing to freeze any, but all my recipes called for about 2 cups of pumpkin purée, so if I do this again this season, I will place 2-cup portions into individual freezer bags.
Was that incredibly demystifying? I hope you'll try it. It's pretty fun. In my opinion, the much harder part is dealing with the seeds. Frankly, I still haven't decided if they're worth it.
Also, I like alliteration.
Okay. So, let's get down to business, folks. First things first: how to make your pumpkin edible. As a side note, I'd like to say that I wasn't planning on eating my pumpkin for a while. She was such a handsome pumpkin.
I didn't even do my usual photo-editing on her. Her color required no enhancement. She was perfect, and I feel that, sitting outside my door alongside a smaller pumpkin, she made my home a little more inviting than my boring grey-and-black door mat usually does, and I was prepared to allow her to continue doing just that through November.
And then we had our homeowner's association annual meeting.
And our property manager walked by my door.
And I was informed that I could not have my pumpkins outside the door, no matter how pretty they were, because they were "live" (by which I think she probably, more accurately, meant "real"). And, you know, they could rot and damage the hallway carpet. Or, worse yet, someone could be in the hallway - drunk! - and could kick the pumpkin and make a mess and - oh dear! - that would be just absolutely catastrophic.
So my pumpkins came inside and I was just about to roll my eyes at the whole thing when I noticed that, what do you know, my littler pumpkin was in fact molding in a place I couldn't see. There was no carpet damage though. And the big pumpkin was perfectly lovely still, so I, ever-so-humbled, roasted her and made some pumpkin "purée" which really isn't puréed at all, at least not the way I did it.
And now I am here to help you salvage your own pumpkin for the purpose of making baked goods, fancy fall hot beverages, and, I don't know, if we're lucky, maybe even pumpkin mac & cheese. It's really easy and less time-consuming than you'd expect, and you only need these tools: roasting pan (either one large or 2 small), really great knife, and ice cream scoop. If you have a grapefruit spoon, that is helpful but by no means necessary.
Okay. So, I'll just tell you what to do step by step.
Step 1: Cut pumpkin in half, using a super sharp knife. I read somewhere that it works to use a serrated knife like a saw. I tried that and learned that it would work to cut my hand in half, but not necessarily to cut my pumpkin in half. I ended up using my giant, recently sharpened chef's knife like an axe and that was great. Oh, and preheat oven to 350 degrees.
Step 2: Remove the seeds, using a fork or spoon or ice cream scoop or grapefruit spoon. This is the hardest part in my opinion. Try to get as much of the stringy fibers out as possible, but don't worry about having some left over. It will kind of burn in the oven and then you can pull it off with your fingers once the pumpkin has been roasted. (If you'd like, save the seeds by putting them in a large bowl of water for now.)
Step 3: Place the pumpkins, skin side down, in a large roasting pan. (I had to cut my pumpkin into three pieces in order to get it to fit. This is fine - better even, maybe, because then it cooks faster.) Add a cup or two of water to the pan so that it's about half an inch deep, or slightly less. Place the pan in the preheated oven (it's okay if it's not all the way hot yet) and roast for 45 minutes. I used the "convection roast" setting on my oven and was v. pleased with the results. If you have it, go for it.
(Meanwhile, you can scrub clean the seeds if you've saved them. Drain them in a colander and place them to dry on a clean towel, in one layer. You could also use paper towels but I think that's totally wasteful so if you do, don't tell me. I'll tell you what to do with them once dry in a later post.)
After 45 minutes, using a fork, check the pumpkin to see if it is malleable/scoopable. It will be v. soft and look like this when done:
Step 4: Using tongs or your hands, covered with towels or something so as not to melt the skin off your fingers, remove the pumpkin halves/pieces from the roasting pan and allow them to dry and cool on a towel or plate. Mine had some condensation in the centers, which poured off quite easily.
Step 5: Have a large container ready that you'd like to use to store your pumpkin. Using an ice cream scoop, carefully (the pumpkins are quite floppy at this point) scoop out the flesh from the pumpkin skins. This is the easiest and most fun part. You will have only the thinnest of skin remaining - like the peel of an apple or pear, but a bit firmer. Pour the pumpkin flesh into your container, ready to store.
My pumpkin was pretty big, and I ended up with about 6 cups of pumpkin flesh. You can store it in your refrigerator for about a week, or in your freezer for a while longer. I used mine all up before needing to freeze any, but all my recipes called for about 2 cups of pumpkin purée, so if I do this again this season, I will place 2-cup portions into individual freezer bags.
Was that incredibly demystifying? I hope you'll try it. It's pretty fun. In my opinion, the much harder part is dealing with the seeds. Frankly, I still haven't decided if they're worth it.
You do make that look easy! I am looking forward to many pumpkin recipes. xo
ReplyDeleteMust. Hold. On. To. Fall. Via. Pumpkin!!!
ReplyDelete