Thursday, September 27, 2012

More than meets the eye (mostly because my photography skills are lacking): Fennel-Roasted Red Pepper Soup

I couldn't even get a good picture of this using the wonder that is Hipstamatic - probably because by using I mean shaking my iPhone to get the next random lens-whatever combo and taking pictures from several angles until I get a photo that actually includes the desired subject (as opposed to my messy counter in the background, for instance) and is at least semi-in-focus.

Fennel Roasted Red Pepper Soup

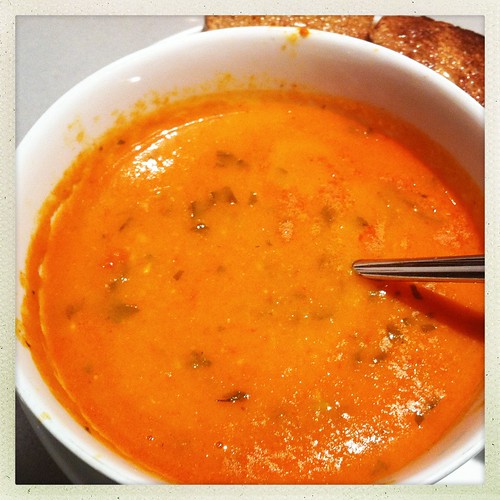
Regardless of lackluster photo though, this soup is WONDERFUL, so I had to post about it so you could all make it asap. The acidity of the tomatoes and lemon juice, sweetness of the red peppers, creaminess of the coconut milk, and super flavorful combination of fennel and basil all give this soup an unexpected complexity, stepping it up from your run-of-the-mill red pepper "bisque". And I didn't even roast my own peppers. (But you can if you want. How-to is at the end of this post, from Simply Recipes.)

Fennel and Roasted Red Pepper Soup
Yield: 6 servings

2 tablespoons oil or butter (I used coconut oil)
1 small bulb fennel, or half a large one (or a whole large one if you LOVE fennel), finely chopped
4 cloves garlic, sliced thin
1 teaspoon aleppo pepper flakes (optional)
1 teaspoon ground ginger (optional)
1 teaspoon salt, divided
1 15-oz jar roasted red peppers, coarsely chopped (or 4-5 red bell peppers, roasted)
1 28-oz can tomatoes, with juices (or 2 lbs fresh tomatoes, coarsely chopped)
2 14.5-oz cans coconut milk (not "lite" kind)
2 cups vegetable broth or chicken broth
2 cups water
1/2 cup minced fresh basil
Juice from half a lemon (~2 tablespoons)

In a large soup pot, heat oil, then add fennel and 1/4 teaspoon salt and sauté until just tender. Add garlic, aleppo pepper, ginger and 1/4 teaspoon salt and sauté until fragrant, about 1-2 minutes more. Add coconut milk, broth, water, red peppers, tomatoes, and remaining 1/2 teaspoon salt. Bring to boil, lower heat and simmer for 20-25 minutes, covered, stirring occasionally. Remove from heat. Using an immersion blender (or using an upright blender, doing 2 cups at a time), purée the soup to get as smooth a consistency as you can. Stir in basil, return pot to burner and cook over low heat for 2-3 minutes. Stir in lemon juice. Taste and add salt and pepper if desired.

How to Roast Red Peppers

1. If you are canning for shelf storage (and not just chilling in the refrigerator), place a steaming rack at the bottom of a large (12-qt) pot, fill half way with water, bring to a boil. It takes a while to get a large pot of water to boil, so while the water is heating, proceed with the recipe.

2a. Broiler Method Position rack in oven so that the top surface of bell peppers placed in the oven will be 4-5 inches from the broiler heat element. Rub the surface of the peppers with a little olive oil (this will help them blister faster). Preheat broiler on high. Place peppers either directly on the top oven rack, with a pan to catch the drippings on a rack beneath, or place on a aluminum-foil or Silpat lined broiler pan (a cookie sheet will warp). As the surface of the peppers blister and blacken, turn them with tongs so that they will blacken on all sides.

2b. Stovetop Method If you have a gas range (or grill) you can place the peppers directly on the range top so that the flames lick the peppers. Work carefully so that as soon as one section of a pepper is blackened, you turn it to work on a fresh side. If you have an electric stove, heat a cast iron pan on high and place the peppers in the pan, allowing the peel to blister and blacken, turning so that all sides get blackened.

3. When the peppers are all well blistered and blackened, place in a non-reactive bowl and cover, or put them in a paper bag and roll the bag shut. (The steam from the hot peppers will help dislodge the skins.) Once the peppers have cooled enough to handle, work with them one by one over a plate, gently peel off the blackened skins. Cut the peppers in half and remove and discard the seed pods, stems and all seeds.

Saturday, September 22, 2012

Not Just For Birds! Lemon Dill Millet Fritters

Let's talk about millet! If you're not gluten-free, into alternative grains, or just plain C-H-E-A-P, you probably haven't eaten it. You might have purchased some in a large bag however, and poured it into a big dish on your deck for the enjoyment of the birds in your neck of the woods. Because millet is bird food. BUT OH SO MUCH MORE!

Close-up with yogurt

Seriously, while I can't go on and on about how tasty millet is, because to me it doesn't taste like much, it has definitely become a versatile and useful ingredient in our household, mostly since I became a parent. Where once upon a time it only appeared in Sadie's Super Baby Porridge, however, now it makes its way into our granola (I just throw in a handful of raw millet to add some crunch), it's often the primary grain in our alterna-bread and vegan/GF pancake recipes, and most recently it's presented itself in veggie-burger form. And that's why we're here. Because millet makes quite a nice little patty. But I rather dislike the word patty, and even though these are delicious they're not sturdy enough to accurately be called "burgers" - I don't want to mislead anyone here - so I've settled on fritters. But, you know, the kind of fritters that don't have any eggs or flour and aren't deep fried. Healthy fritters. Made with bird food millet.

I made these earlier in the summer when there were beautiful, fragrant young leeks available and dill was growing like a weed everywhere. Depending on where you live, you could still probably get some fresh local leeks and dill (and summer squash) to make these happen, but you'd better hurry. In Minneapolis, it's gotten super cold super fast. Pumpkins and apples were taking over the whole farmer's market this morning.

leeks!dill!in which your food processor may come in handycast iron skillet GOfry 'em updinner is served

You'll probably need a food processor to make the actual fritters. Some fine chopping might do the job, but I'm not sure they'd hold up with a less smooth texture. If you don't have a food processor and are still interested in this combination of ingredients, however, the cooked millet + sautéed vegetable mixture is delicious and could be served as is (i.e. not pattied, not frittered), hot or lukewarm. Beckett loved it.

Lemon-Dill Millet Fritters
Adapted from The Whole Life Nutrition Cookbook
Yield: 4 servings

1 cup millet
2 cups water
1/8 teaspoon salt

3 small leeks, or 1 large one (1 lb), thinly sliced and well-rinsed
2-3 zucchini or other summer squash (1.5 lbs), finely chopped
Large handful dill (~half a grocery store bunch, or 1/2 cup loosely packed), chopped
Zest and juice of 2 lemons
1/4 teaspoon salt, divided
4 tablespoons coconut oil (or butter), divided

Rinse millet in a fine mesh strainer before placing it in a medium pot. Cover with 2 cups water and add 1/8 teaspoon salt. Bring to boil over medium-high heat, then turn down heat, cover, and allow to simmer for 30 minutes. 

Meanwhile, melt 1 tablespoon coconut oil or butter in a skillet. Add leeks, 1/8 teaspoon salt, and sauté over medium heat, stirring every couple minutes, until soft and fragrant, about 5-8 minutes. Add zucchini and lemon zest and remaining 1/8 teaspoon salt, and continue cooking, stirring occasionally, until soft. Remove from heat. Stir in dill and lemon juice. Wipe down the skillet but keep it out for frying the fritters. 

Put vegetable mixture into food processor and pulse a few times. Add cooked millet and pulse until just mixed - it will have the consistency of thick hummus. Form mixture into patties. Heat oil in the skillet - 1 tablespoon at a time - over medium heat and lightly sauté patties for about 3-4 minutes per side. As I mentioned before getting to the recipe, these aren't the sturdiest, so flip and remove from pan gingerly. (They will be worth the care, as they are as attractive as they are pretty when they're intact!)

I topped mine with some plain yogurt and garnished them with some more dill.

Thursday, September 6, 2012

Upcoming Classes at Local D'Lish

Hello! Fall/winter classes have started at Local D'Lish! It's so fun! I'll be teaching most Thursday evenings, plus one Sunday and one Wednesday afternoon per month. Classes are for beginners who need help getting started in the kitchen, or more advanced home cooks looking for some new basics to add to their repertoire. We aren't fancy. We simply believe that good, local, seasonal food and a few basic but versatile skills are all you need to make delicious homemade meals. We also believe that food builds community! I think that's why our classes are so fun.

The classes I'll be teaching in the next few months are listed below. They are mostly vegetarian and often if they are not gluten-free and/or vegan, I will provide information on how to adapt them to suit those diets. Conversely, I always tell my class participants how fish and meat can be incorporated into our veggie-centric dishes. (Noteworthy exception: my Brunch for a Crowd class is not vegetarian or gluten-free. Like not even close. It's not an alternative or hypoallergenic brunch class. It's a class about pleasing a large group of people with wheat and eggs and mimosas.)

Fall
Sunday, Sept. 9, 1-3:30 pm: Quick Weeknight Meals
Thursday, Sept. 13, 6-8:30 pm: Brunch for a Crowd (my most fun class)
Wednesday, Sept. 19, 1-3:30 pm: Culinary Basics: Pasta Sauces 101
Thursday, Sept. 20, 6-8:30 pm: Culinary Basics: Root Vegetables (way more fun than it sounds!)
Sunday, Sept. 23, 1-3:30 pm: Quick Weeknight Meals
Sunday, Oct. 21, 1-3:30 pm: Culinary Basics: Root Vegetables
Thursday, Oct. 25, 6-8:30 pm: Autumn Salads (gluten-free and vegan)
Thursday, Nov. 1, 6-8:30 pm: Quick Weeknight Meals
Thursday, Nov. 8, 6-8:30 pm: Culinary Basics: Root Vegetables
Wednesday, Nov. 14, 1-3:30 pm: Culinary Basics: Holiday Side Dishes
Thursday, Nov. 15, 6-8:30 pm: Quick Weeknight Meals
Sunday, Nov. 18, 1-3:30 pm: Seasonal Side Dishes
Thursday, Nov. 29, 6-8:30 pm: Eating Local Through Winter

Winter
Thursday, Dec. 6, 6-8:30 pm: Quick Weeknight Meals
Wednesday, Dec. 12, 1-3:30 pm: Eating Local Through Winter
Thursday, Dec. 13, 6-8:30 pm: Winter Salads (gluten-free and vegan)
Sunday, Dec. 16, 1-3:30 pm: Quick Weeknight Meals through the Holidays
Thursday, Dec. 20, 6-8:30 pm: Culinary Basics: Holiday Side Dishes
Thursday, Jan. 3, 6-8:30 pm: Quick Weeknight Meals
Sunday, Jan. 6, 1-3:30 pm: Eating Local Through Winter
Thursday, Jan 10, 6-8:30 pm: Culinary Basics: Root Vegetables
Wednesday, Jan. 16, 1-3:30 pm: Cook for the Week (a super fun, useful class!)
Thursday, Jan. 17, 6-8:30 pm: Quick Weeknight Meals
Thursday, Jan. 24, 6-8:30 pm: Brunch for a Crowd
Thursday, Jan. 31, 6-8:30 pm: Quick Weeknight Meals
Sunday, Feb. 3, 1-3:30 pm: Quick Weeknight Meals
Thursday, Feb. 7, 6-8:30 pm: Simple Vegan Dinners
Thursday, Feb. 14, 6-8:30 pm: Brunch for a Crowd
Thursday, Feb. 21, 6-8:30 pm: Quick Weeknight Meals
Wednesday, Feb. 27, 1-3:30 pm: Cook for the Week
Thursday, Feb. 28, 6-8:30 pm: Winter Salads (gluten-free and vegan)

The whole schedule is posted on Local D'Lish's website. Come spring, I am hoping to incorporate a lot more of the gluten-free / egg-free / allergy-friendly stuff I'm learning into my classes and perhaps even offer specific classes geared towards families working through food sensitivities. I'm still learning - I'll be learning forever - but come spring I think I'll have a class or two's worth of knowledge and practice to share with people in a similar boat. I also intend to pitch class ideas to some of the food co-ops and natural foods markets in the area. I will keep you posted on that; it probably won't happen until spring, if at all. I have other ideas too and am working on being less scattered and more purposeful about making them happen... baby steps.

Here are some nice things people have said about me after taking one of my cooking classes:

Commentary 2Commentary 1Commentary 4

(More here. I photograph these badboys because they are the best affirmation/ motivation ever! Nobody left me thank-you notes at the Family Justice Center. It would have made all the difference.)

(Oh! Note: aforementioned cinnamon rolls are from brunch class, fyi. So sign up! Cinnamon rolls included! Now you can't resist!)

Please feel free to email me with any questions about the classes: cakeandedith at gmail dot com. I take all feedback seriously - not just the compliments, so if you've attended a class and have ideas about how I can improve things, please let me know. To register for classes, sign up through Local D'Lish.

I love love LOVE teaching - almost as much as I love eating. I am committed to getting better and better at teaching all the time. And while I have already mastered the fine art of eating - not one to resist yet another advanced degree - I intend to obtain the equivalent of a Ph.D. in said art in just a few weeks. Italy, baby, YEAH!

xoxo