
That title is a mouthful, isn't it? Well, I couldn't decide what aspects of this pie to highlight because everything about it is so freaking wonderful, so I opted to just say it all in the title. BECAUSE IT IS ALL WONDERFUL.

I'm on my big California vacay right now at 205 View Court, land of milk and honey and bottomless pots of perfectly brewed fresh coffee. I love it here. I know most (some?) people ditch the internets when they go out of town, but this little foodie blog is my thing, you know? My labor of love. My little contribution. My cognitive dissonance. I enjoy researching, preparing, photographing, devouring, and sharing everything you see here. I find it mostly relaxing. And relaxing is what one's meant to do on vacation. So now I'm in California and I have two weeks to share some of the things that have been piling up because here - God Bless California - there are countless loving arms and goofy personalities to entertain my rather needy daughter. Yay for me! And dare I be so bold: yay for you.
On the night before we boarded our plane, I uploaded all my recent food pictures and typed up six draft posts with the recipe basics and a few random tidbits I didn't want to forget. My goal is to flesh them all out while I'm vacationing and post them for your viewing (baking? eating?) pleasure.
My first post was going to be spicy black bean burgers - SO FREAKING GOOD, plus I didn't want to have three desserts in a row because variety is the spice of life - but then I got an email from a friend of mine who happened to be at the party where the last third of the pie described herein happened to be polished off. She called it "AMAZING" - and I will love her forever for saying that because all I want in life is for my baked goods to be well-received and a compliment like that will suffice just fine thank you v. much - and asked if the recipe was on my blog. It wasn't yet, but I'm here to please so it got bumped to the top of the list.
Don't worry though - spicy black bean burgers are only a day or three away.
A few notes on Pie, the lovely cookbook that inspired the above-featured glorious creation. This cookbook is awesome. By which I mean, it is totally worth owning. It doesn't have as many pictures as I like in my cookbooks, and there are some super randoms in it for sure (Watermelon Rind Pie? I guess if we're preparing for our Next Great Depression.), but there is a recipe for almost every pie you have ever heard of and many you haven't, the few pictures that are included are beautiful, and all three of the pies I have made from the book have been excellent (Shoefly, Fresh Fig & Raspberry, Peach Red Currant). And I've only made three pies in my life, so if this book's recipes allowed this novice to make excellent pies on her first three tries, well, that fact just speaks for itself, right?
I combined and messed with a couple of recipes from his book in crafting this little darling. The pie crust is based on the Basic Flaky Pastry recipe and the rest is based mostly on a Peach-Sour Cherry Pie recipe but then I saw these gorgeous red currants at the farmer's market and one thing led to another and, well, yum. Enjoy, folks, enjoy.

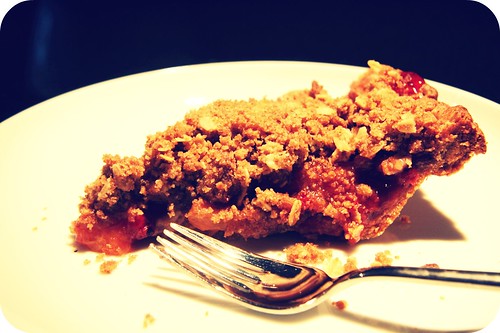
Peach Red Currant Pie with Whole Wheat Cinnamon Crust and Buttery Oatmeal Crumble
Adapted from Pie by Ken Haedreich
Yield: 8-10 servings
Whole Wheat-Cinnamon Flaky Pie Crust
1 cup all-purpose flour
1/2 cup whole wheat flour
1 tablespoon sugar
1 teaspoon cinnamon
1/2 teaspoon salt
1/4 cup cold unsalted butter, cut into 1/4" pieces
1/4 cup cold vegetable shortening, cut into 1/4" pieces
1/4 cup cold water
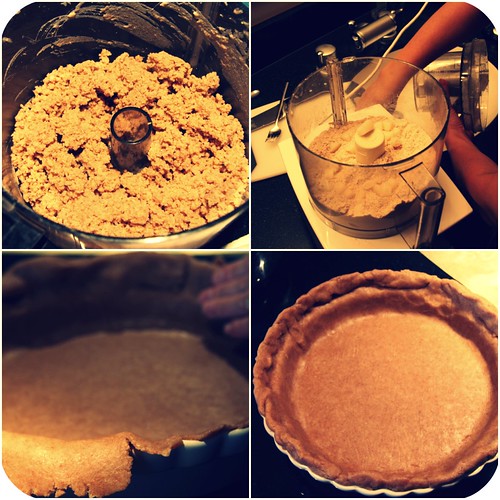
I used the food processor to make my pie crust and you should too. Put flour, sugar, cinnamon and salt in the food processor and pulse a few times to mix. Scatter the butter over the dry ingredients and pulse the machine 5 or 6 times to cut it in. Fluff the mixture with a fork, lifting it up from the bottom. Scatter the shortening in now and pulse again 5 or 6 times. Stir with a fork again. Drizzle half the water over the flour mixture and pulse 5-6 times. Fluff the mixture one last time and sprinkle the remaining water on top. Pulse a few more times, until the dough starts to form clumps. Do this until it will look like coarse crumbs. Dump dough into a large bowl.
Using your hands, pack the pastry into a ball. Knead the ball once or twice, then flatten it into a 3/4" thick disk. Wrap the disk in plastic and refrigerate for at least an hour or overnight before rolling.
Pie Filling
4 cups ripe peaches
1 cup fresh red currants
1/2 cup sugar
1 tablespoon fresh lemon juice
1/4 cup light brown sugar
3 tablespoons corn starch
Big pinch of each: freshly ground nutmeg, cinnamon, ground ginger
On a sheet of lightly floured waxed paper, roll the pastry into a 13-inch circle with a floured rolling pin (mine was not floured and I used unfloured counter top - worked fine but only try it if you know your counter top v. well). Invert the pastry over a 9 1/2" pie pan, center, and peel off the paper. Gently tuck the pastry into the pan, without stretching it, and sculpt the overhang with an upstanding ridge. Place in the freezer for 15 minutes.
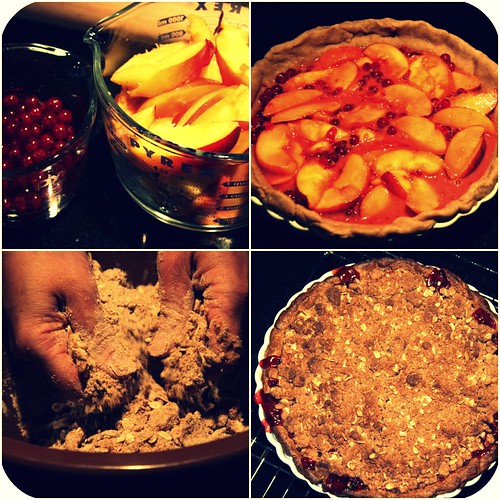
Preheat oven to 400. Combine the peaches, red currants, white sugar, and lemon juice in a large bowl. Stir a bit and set aside for 10 minutes to juice.
In a small bowl, combine the brown sugar and cornstarch. Stir the mixture into the fruit and then add the spices. Turn the filling into the chilled pie shell and smooth the top of the fruit with your hands. Place the pie on the center oven rack and bake for 30 minutes.
Crumble
1 cup whole wheat flour
1/2 cup rolled oats
2/3 cup brown sugar
1/2 teaspoon cinnamon
1/4 teaspoon salt
1/2 cup cold unsalted butter, cut into 1/4" pieces
Either pulse everything together in the food processor a few times until pea-sized chunks are mixed with finer crumbs, or accomplish same by just mixing it with your hands. The latter is v. rewarding and feels nice.
Remove the pie from the oven and reduce temp to 375. Carefully dump the crumbs in the center of the pie, spreading them outward with your hands to cover the whole surface. Return the pie to the oven, placing it so that the part that faced the back of the oven now faces forward. Just in case, slide a large aluminum foil-lined baking sheet onto the rack below to catch any spills. (This is a v. good idea!) Continue to bake until the top is dark golden brown and the juices bubble thickly at the edge, 35-40 minutes. If the topping starts to get too dark, loosely cover the pie with tented aluminum foil during the last 15 minutes of baking. (I didn't have to do that last part.)
Transfer the pie to a wire rack and let cool for at least 2 hours (preferably 3-4) before serving.
This is DELICIOUS. It also stored well at room temperature for three days and then in the refrigerator for another couple. I imagine it would freeze well too but can't speak to that with certainty. Next time though. When my freezer isn't full of baby food cubes and breastmilk.
Now if you'll excuse me... I have a second first birthday party to attend.
I'm on my big California vacay right now at 205 View Court, land of milk and honey and bottomless pots of perfectly brewed fresh coffee. I love it here. I know most (some?) people ditch the internets when they go out of town, but this little foodie blog is my thing, you know? My labor of love. My little contribution. My cognitive dissonance. I enjoy researching, preparing, photographing, devouring, and sharing everything you see here. I find it mostly relaxing. And relaxing is what one's meant to do on vacation. So now I'm in California and I have two weeks to share some of the things that have been piling up because here - God Bless California - there are countless loving arms and goofy personalities to entertain my rather needy daughter. Yay for me! And dare I be so bold: yay for you.
On the night before we boarded our plane, I uploaded all my recent food pictures and typed up six draft posts with the recipe basics and a few random tidbits I didn't want to forget. My goal is to flesh them all out while I'm vacationing and post them for your viewing (baking? eating?) pleasure.
My first post was going to be spicy black bean burgers - SO FREAKING GOOD, plus I didn't want to have three desserts in a row because variety is the spice of life - but then I got an email from a friend of mine who happened to be at the party where the last third of the pie described herein happened to be polished off. She called it "AMAZING" - and I will love her forever for saying that because all I want in life is for my baked goods to be well-received and a compliment like that will suffice just fine thank you v. much - and asked if the recipe was on my blog. It wasn't yet, but I'm here to please so it got bumped to the top of the list.
Don't worry though - spicy black bean burgers are only a day or three away.
A few notes on Pie, the lovely cookbook that inspired the above-featured glorious creation. This cookbook is awesome. By which I mean, it is totally worth owning. It doesn't have as many pictures as I like in my cookbooks, and there are some super randoms in it for sure (Watermelon Rind Pie? I guess if we're preparing for our Next Great Depression.), but there is a recipe for almost every pie you have ever heard of and many you haven't, the few pictures that are included are beautiful, and all three of the pies I have made from the book have been excellent (Shoefly, Fresh Fig & Raspberry, Peach Red Currant). And I've only made three pies in my life, so if this book's recipes allowed this novice to make excellent pies on her first three tries, well, that fact just speaks for itself, right?
I combined and messed with a couple of recipes from his book in crafting this little darling. The pie crust is based on the Basic Flaky Pastry recipe and the rest is based mostly on a Peach-Sour Cherry Pie recipe but then I saw these gorgeous red currants at the farmer's market and one thing led to another and, well, yum. Enjoy, folks, enjoy.
Peach Red Currant Pie with Whole Wheat Cinnamon Crust and Buttery Oatmeal Crumble
Adapted from Pie by Ken Haedreich
Yield: 8-10 servings
Whole Wheat-Cinnamon Flaky Pie Crust
1 cup all-purpose flour
1/2 cup whole wheat flour
1 tablespoon sugar
1 teaspoon cinnamon
1/2 teaspoon salt
1/4 cup cold unsalted butter, cut into 1/4" pieces
1/4 cup cold vegetable shortening, cut into 1/4" pieces
1/4 cup cold water
I used the food processor to make my pie crust and you should too. Put flour, sugar, cinnamon and salt in the food processor and pulse a few times to mix. Scatter the butter over the dry ingredients and pulse the machine 5 or 6 times to cut it in. Fluff the mixture with a fork, lifting it up from the bottom. Scatter the shortening in now and pulse again 5 or 6 times. Stir with a fork again. Drizzle half the water over the flour mixture and pulse 5-6 times. Fluff the mixture one last time and sprinkle the remaining water on top. Pulse a few more times, until the dough starts to form clumps. Do this until it will look like coarse crumbs. Dump dough into a large bowl.
Using your hands, pack the pastry into a ball. Knead the ball once or twice, then flatten it into a 3/4" thick disk. Wrap the disk in plastic and refrigerate for at least an hour or overnight before rolling.
Pie Filling
4 cups ripe peaches
1 cup fresh red currants
1/2 cup sugar
1 tablespoon fresh lemon juice
1/4 cup light brown sugar
3 tablespoons corn starch
Big pinch of each: freshly ground nutmeg, cinnamon, ground ginger
On a sheet of lightly floured waxed paper, roll the pastry into a 13-inch circle with a floured rolling pin (mine was not floured and I used unfloured counter top - worked fine but only try it if you know your counter top v. well). Invert the pastry over a 9 1/2" pie pan, center, and peel off the paper. Gently tuck the pastry into the pan, without stretching it, and sculpt the overhang with an upstanding ridge. Place in the freezer for 15 minutes.
Preheat oven to 400. Combine the peaches, red currants, white sugar, and lemon juice in a large bowl. Stir a bit and set aside for 10 minutes to juice.
In a small bowl, combine the brown sugar and cornstarch. Stir the mixture into the fruit and then add the spices. Turn the filling into the chilled pie shell and smooth the top of the fruit with your hands. Place the pie on the center oven rack and bake for 30 minutes.
Crumble
1 cup whole wheat flour
1/2 cup rolled oats
2/3 cup brown sugar
1/2 teaspoon cinnamon
1/4 teaspoon salt
1/2 cup cold unsalted butter, cut into 1/4" pieces
Either pulse everything together in the food processor a few times until pea-sized chunks are mixed with finer crumbs, or accomplish same by just mixing it with your hands. The latter is v. rewarding and feels nice.
Remove the pie from the oven and reduce temp to 375. Carefully dump the crumbs in the center of the pie, spreading them outward with your hands to cover the whole surface. Return the pie to the oven, placing it so that the part that faced the back of the oven now faces forward. Just in case, slide a large aluminum foil-lined baking sheet onto the rack below to catch any spills. (This is a v. good idea!) Continue to bake until the top is dark golden brown and the juices bubble thickly at the edge, 35-40 minutes. If the topping starts to get too dark, loosely cover the pie with tented aluminum foil during the last 15 minutes of baking. (I didn't have to do that last part.)
Transfer the pie to a wire rack and let cool for at least 2 hours (preferably 3-4) before serving.
This is DELICIOUS. It also stored well at room temperature for three days and then in the refrigerator for another couple. I imagine it would freeze well too but can't speak to that with certainty. Next time though. When my freezer isn't full of baby food cubes and breastmilk.
Now if you'll excuse me... I have a second first birthday party to attend.


